User Guide
- 1. Introduction 🎯
- 2. Quick Start Guide ⚡️
- 3. GUI components 🖥️
- 4. Common Parameters 🔍
- 5. Features ⭐️
- 6. Command Summary 📚
- 7. Glossary 📚
1. Introduction 🎯
Why This Guide ❓
The purpose of this guide is to empower you with the knowledge and skills needed to effectively utilize CareCentral. Our goal is to streamline your workflow in managing patients’ medical journeys, ensuring that you can leverage the system’s features for efficient and accurate patient care. This guide is meticulously crafted to help you navigate, utilize, and optimize CareCentral, enhancing your ability to provide the best possible care to your patients.
Our Target Audience 👥
CareCentral is built specifically for medical staffs — including doctors, nurses, and hospital staff aged between 25-60 years. We understand the importance of your time and the need for a tool that compliments your expertise and fast typing abilities, thus CareCentral is built to be fast, intuitive, and easy to use.
2. Quick Start Guide ⚡️
Here’s how you can get started with CareCentral quickly:
- Ensure you have Java 11 installed in your computer. If you need a video guide, you can refer to this video for Windows users and this video for macOS users.
- If you are using Linux, Java 11 is already installed in your computer by default. You can check by typing
java -versionin your terminal. - Download the latest
carecentral.jarfrom here if you have not downloaded it yet. - Copy the file to the folder you want to use as the home folder for CareCentral.
- Double-click the file to start the app. The GUI similar to the below should appear in a few seconds.

- Alternatively, you can also use the terminal and go to the folder where the
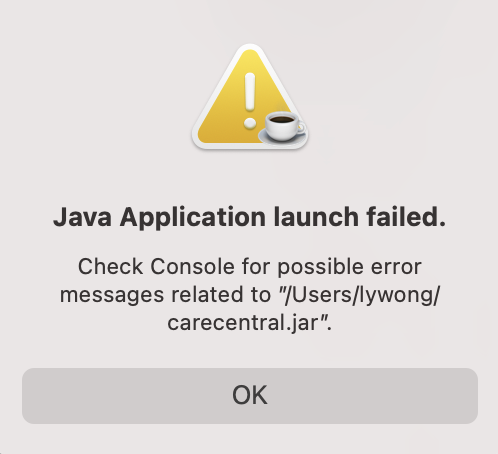
carecentral.jaris located and typejava -jar carecentral.jarin the command box to start the app. - For Mac users who are unable to open the file or encountering the issue below, follow this guide.
- Type the command in the command box and press
Enterto execute it. e.g. typinghelpand pressingEnterwill open the help window, which is a link that redirects you back to this guide. So don’t worry if you lost the link to this user guide, CareCentral got you covered!
Some example commands you can try:add-patient n/John Doe ic/S1234567A p/98765432 e/johnd@example.com a/25 t/Diabeticlist-patientsdelete-patient 1exit
2.2 Navigating the User Guide
This section will explain the different elements of the user guide and how to navigate it.
2.2.1. Navigation
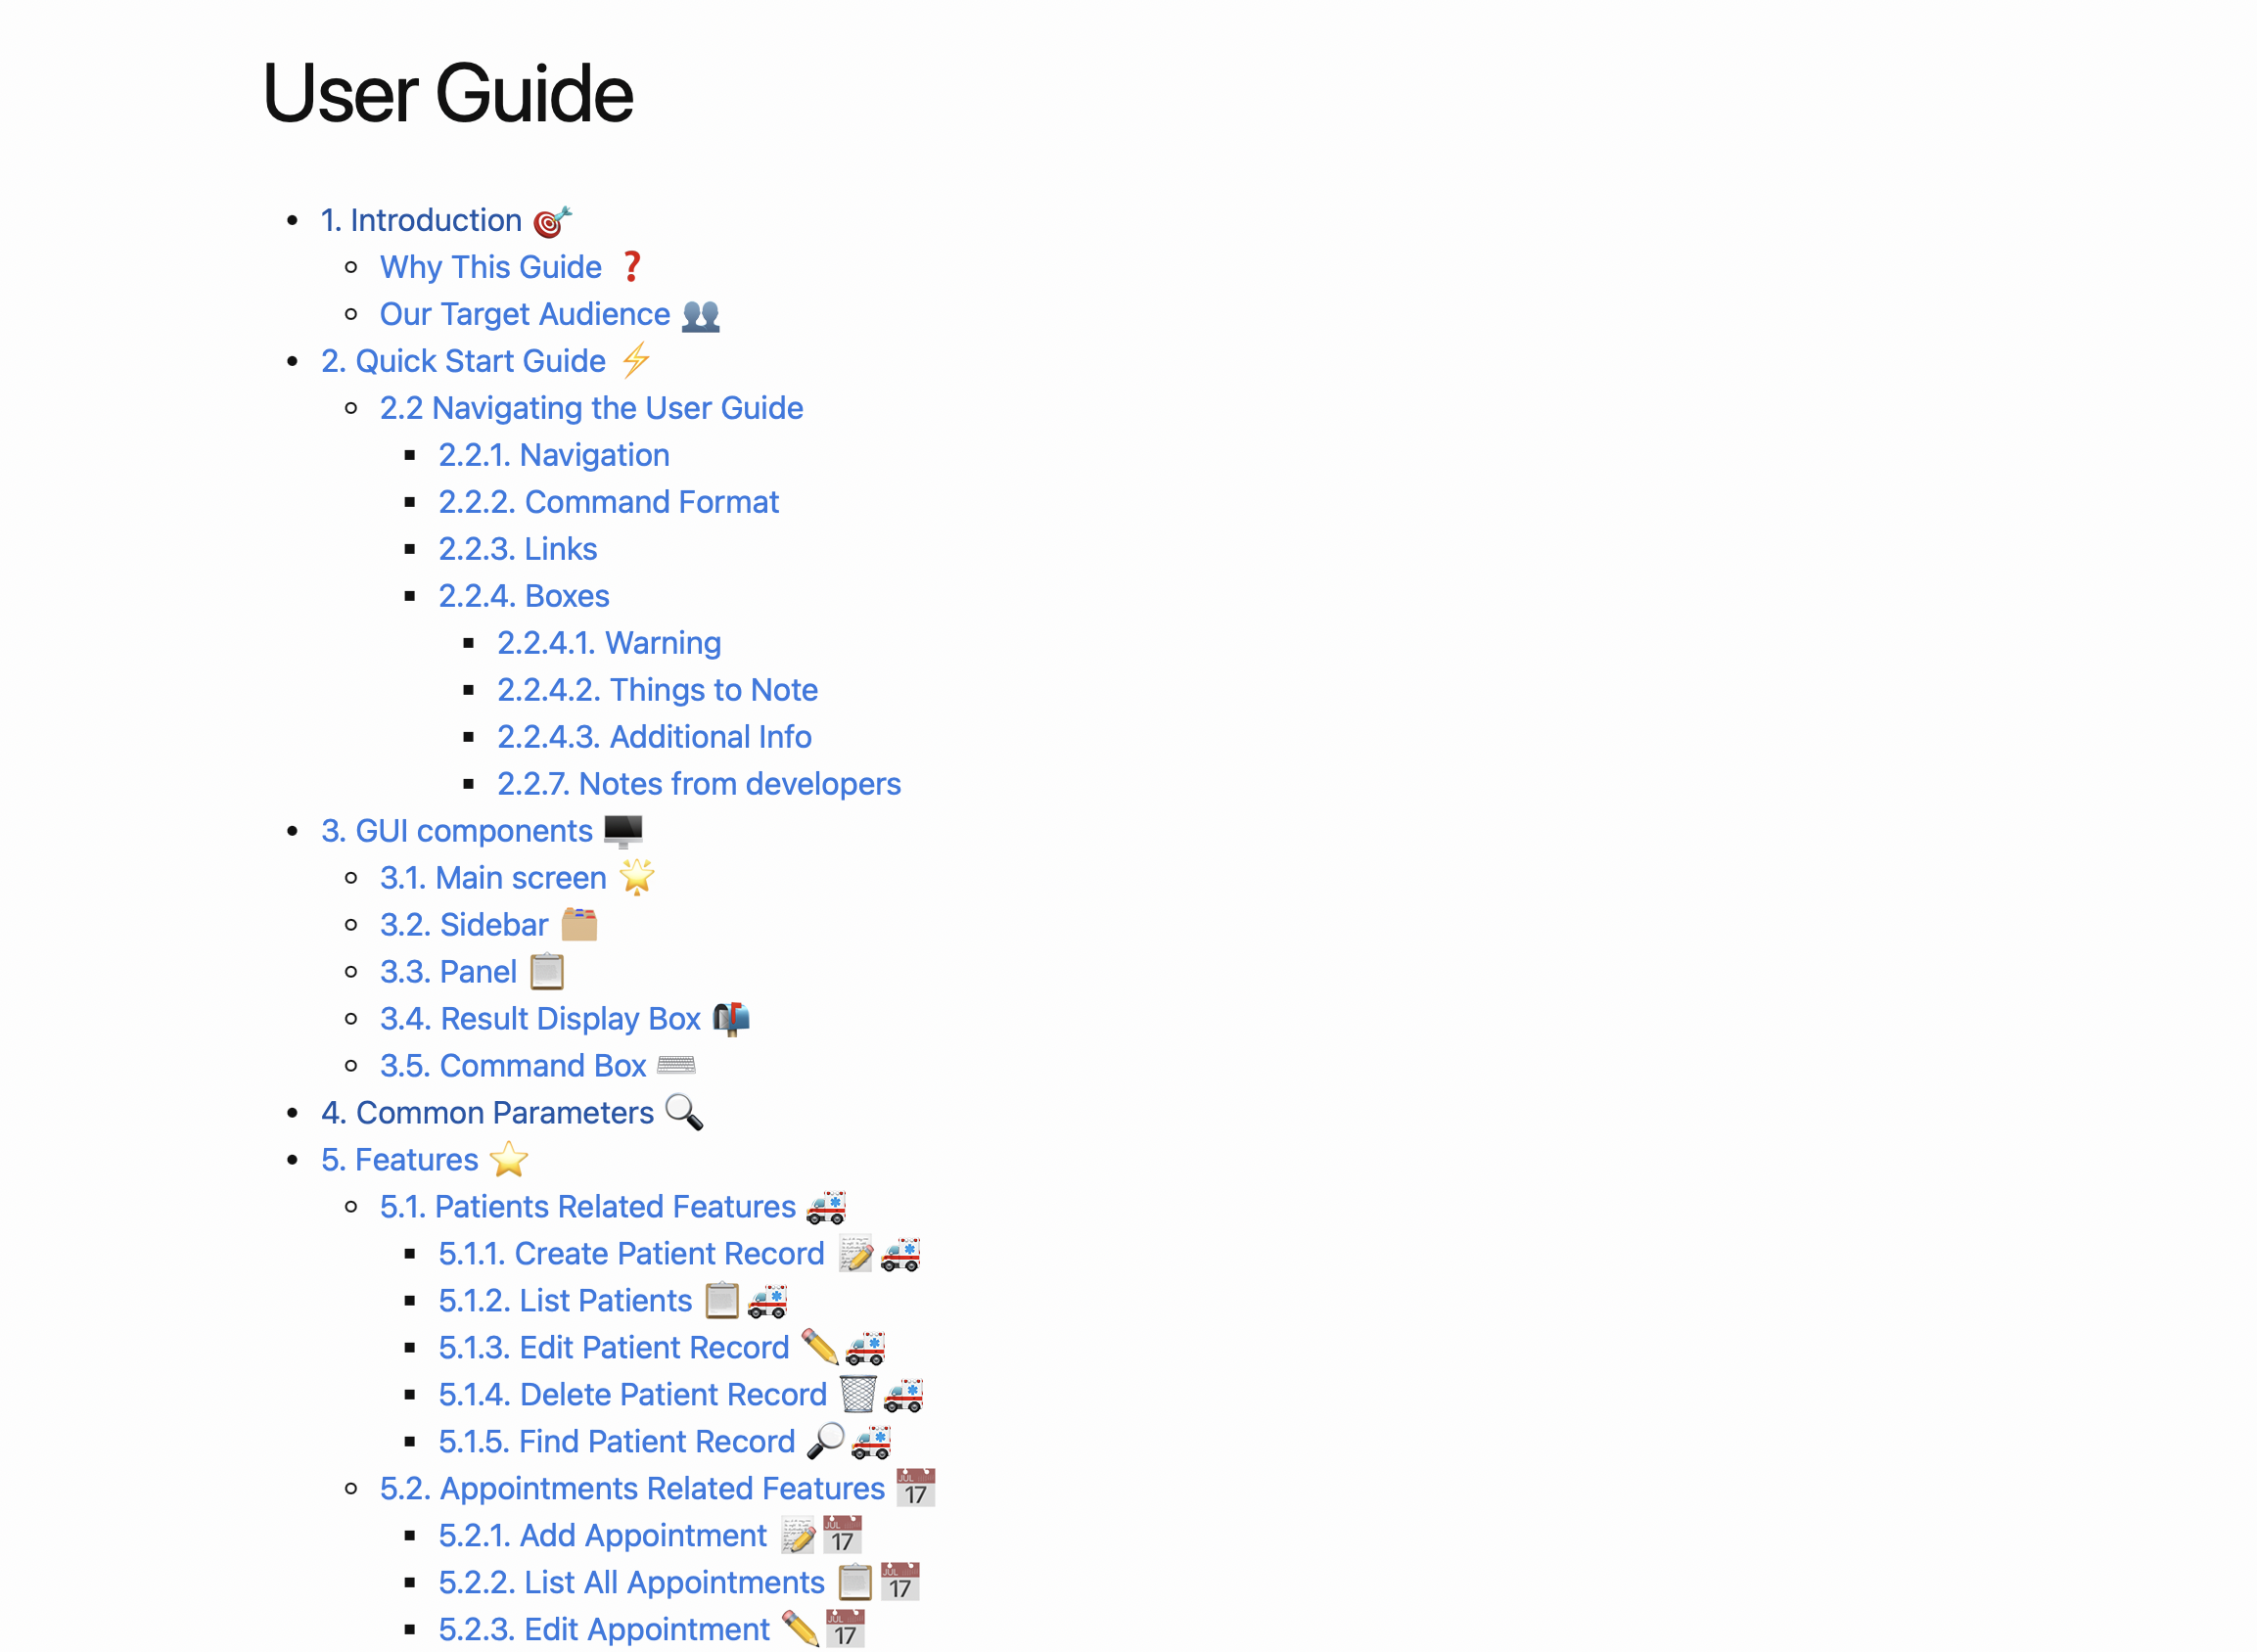
You can navigate the user guide by clicking on the links in the table of contents on the top of the User Guide.
2.2.2. Command Format
This is the format of a Command in the User Guide
2.2.3. Links
Links will be displayed in this format. These are clickable links that will bring you to the respective section.
2.2.4. Boxes
2.2.4.1. Warning
❗Warning: This is a warning, information in this box is extremely important. Ignoring the warnings may result in irreversible error of the application.
2.2.4.2. Things to Note
Things that you should take note before using the respective command will be displayed in this format.
2.2.4.3. Additional Info
Things that are good to know but not compulsory, but might come in handy in using the feature will be displayed in this format.
2.2.4.4. Notes from developers
These are notes from the developers to explain the rationale of implementation of certain features.
3. GUI components 🖥️
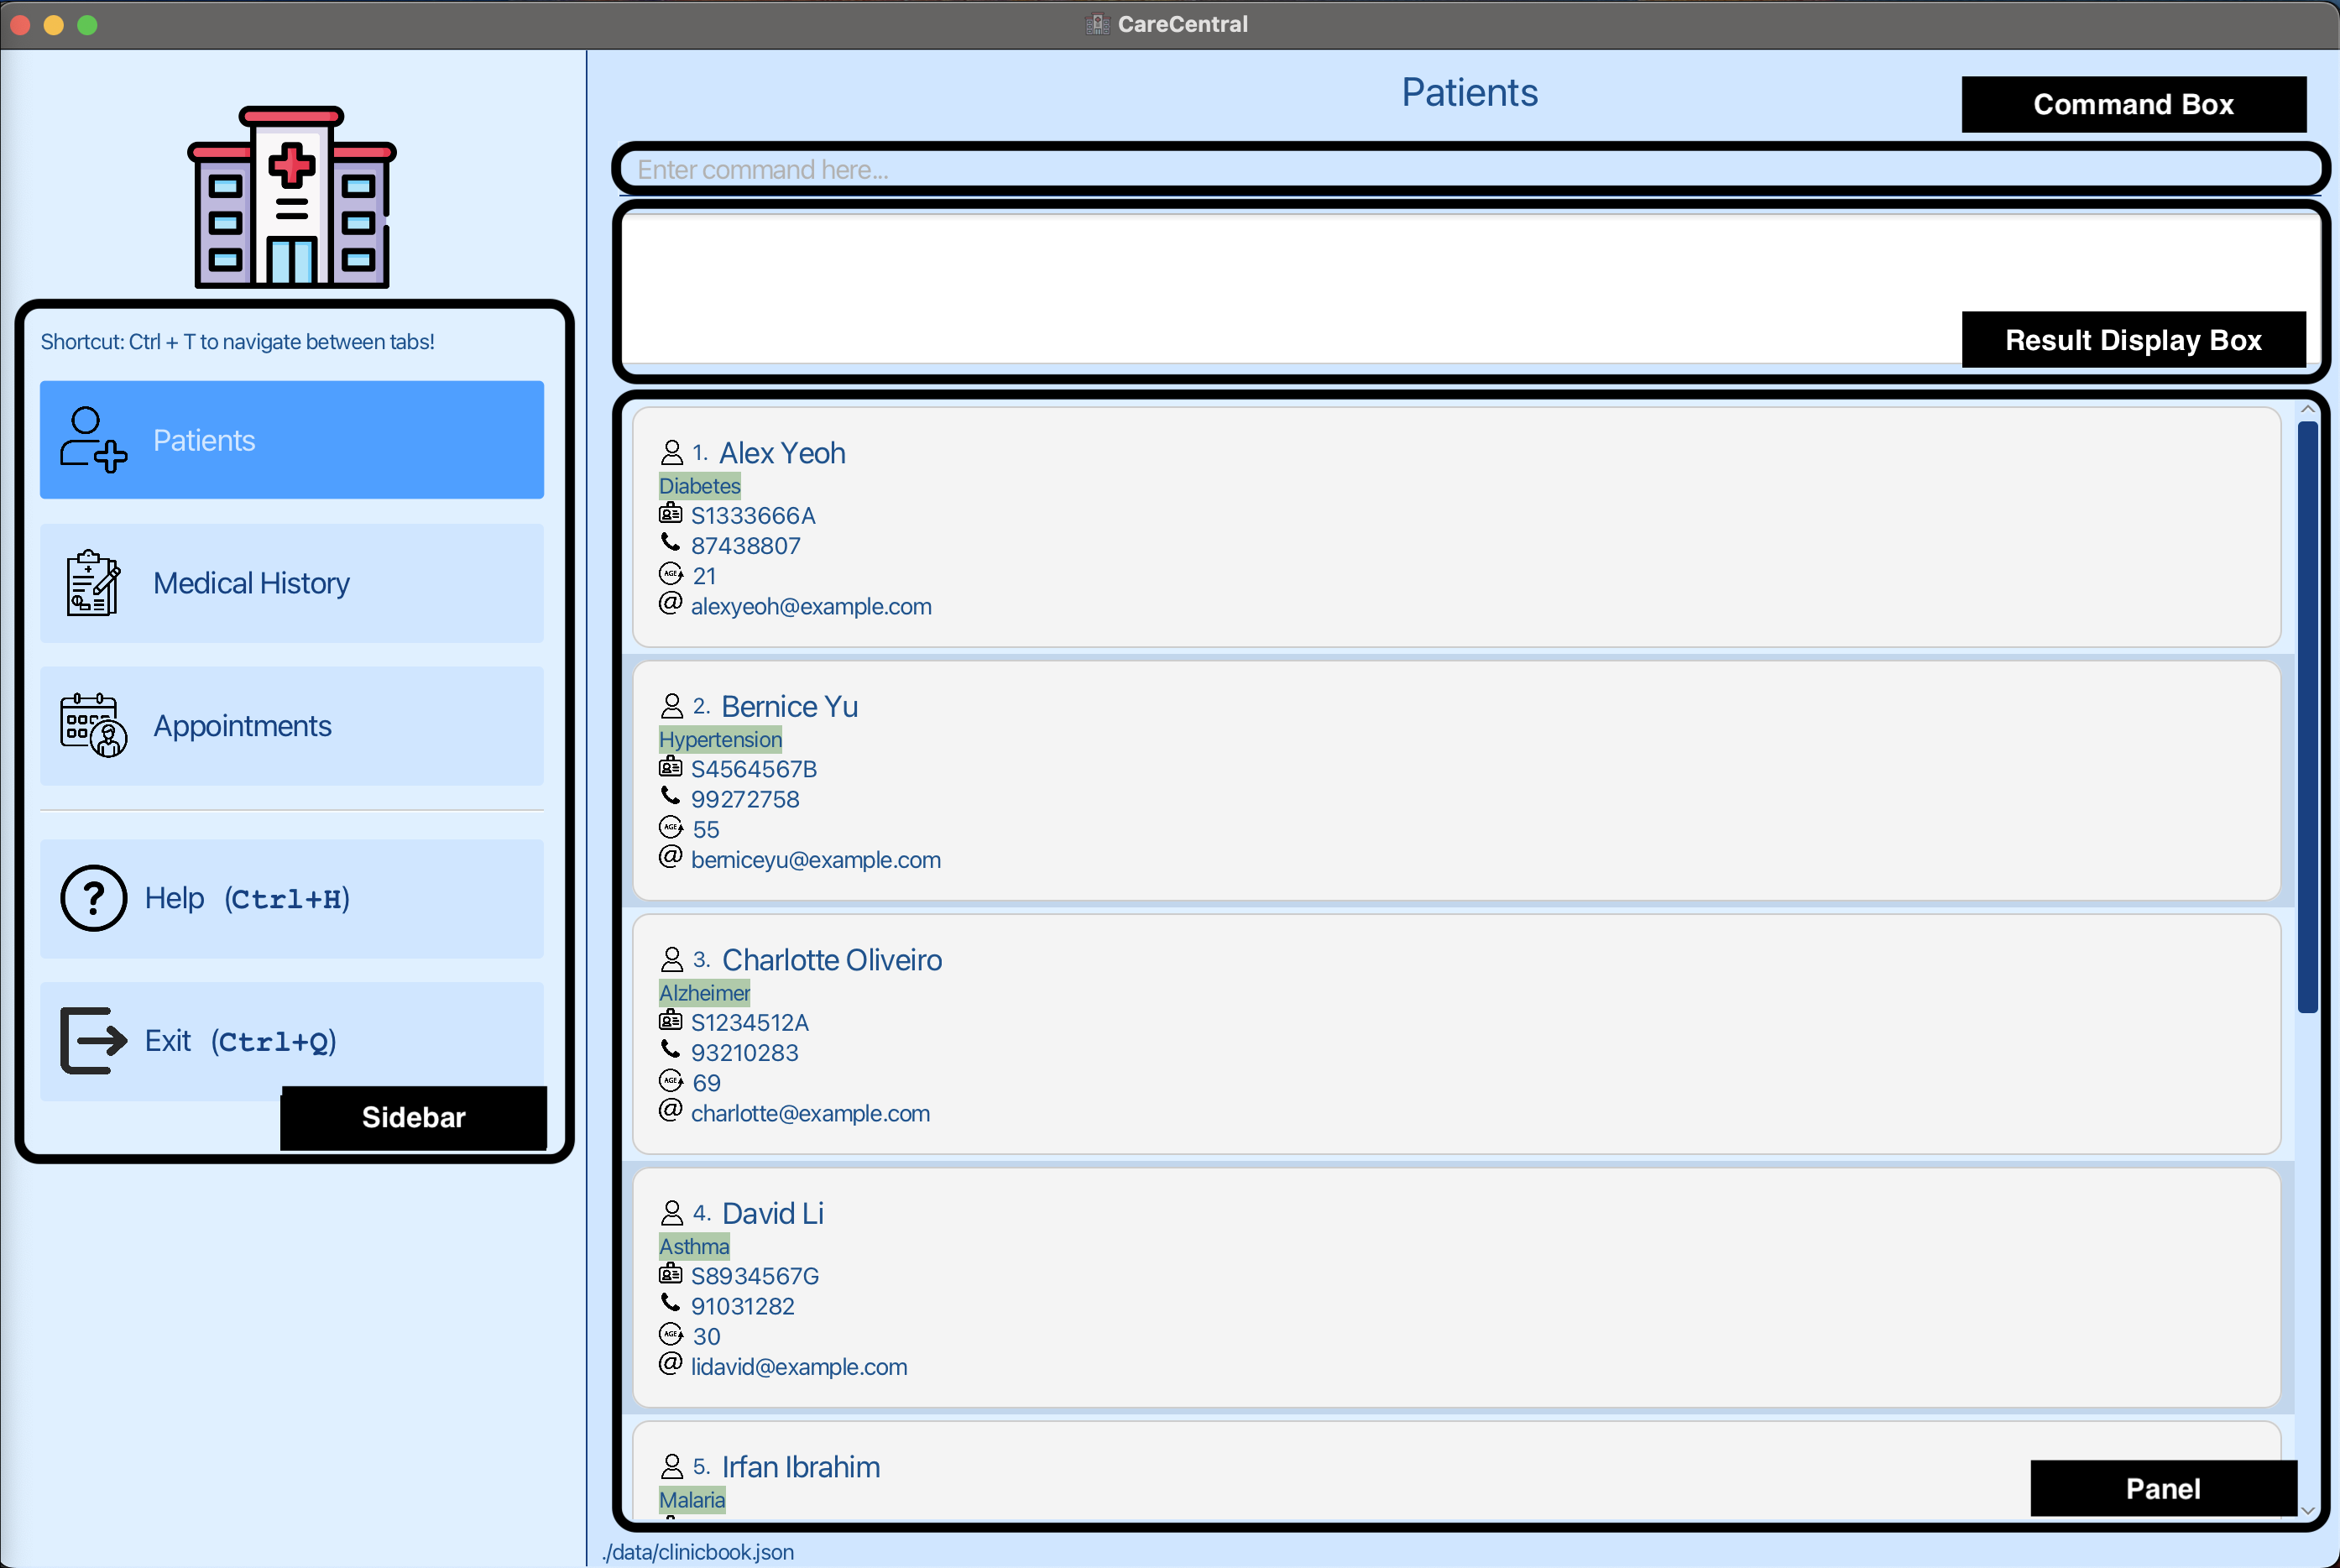
3.1. Main screen 🌟
3.2. Sidebar 🗂️
The sidebar contains the following tabs:
- Patients
- Medical History
- Appointments
You can switch between tabs by clicking on the respective tabs, using the switch command (see here) or using the Ctrl + T shortcut.
3.3. Panel 📋
There are 3 panels in the main screen depending on which tab is selected:
- Patient List Panel
- Medical History Panel
- Appointment Panel
You can switch between the panels by switching between the respective tabs using the Ctrl + T shortcut or by simply clicking on the tab itself.
3.4. Result Display Box 📬
The result display box displays the result of the command executed.
3.5. Command Box ⌨️
The command box is where you type in the commands to be executed.
4. Common Parameters 🔍
Below is a table of parameters you’ll commonly use in CareCentral, along with their explanations and constraints:
| Parameters | Explanations | Constraints |
|---|---|---|
n/NAME |
Full name of the patient | Must only contain alphabets, numbers and spaces, and it should not be blank |
p/PHONE_NUMBER |
Phone number of the patient | Must only contain alphabets, numbers and exactly 8 digits long |
ic/NRIC |
NRIC of the patient | Must only contain alphabets and numbers as per Singapore standards. |
a/AGE |
Age of the patient | Must be a positive integer |
e/EMAIL |
Email address of the patient | Must be a valid email address |
[t/TAG]… |
Information that is related to the patient | Must only contain alphabets and numbers, and it should not be blank |
APPOINTMENT_INDEX |
Index of the appointment in the displayed appointment list | Must be a positive integer |
d/DATE |
Date of appointment or event | Must be in the format YYYY-MM-DD |
t/TIME |
Time of appointment or event | Must be in the format HH:MM (24-hour format) |
pi/PATIENT_INDEX |
Index of the patient in the displayed patient list. Can refer to patients tab to find out about the patient’s index | Must be a positive integer |
MEDICAL_HISTORY_INDEX |
Index of the medical history in the displayed medical history list | Must be a positive integer |
mc/MEDICAL_CONDITION |
Medical condition of the patient | Must only contain alphabets, numbers and spaces, and it should not be blank |
t/TREATMENT |
The treatment prescribed or administered for the medical condition. If no treatment, you can write ‘None’ | Must only contain alphabets, numbers and spaces, and it should not be blank |
mn/MEDICATION_NAME |
Name of the medication prescribed | Must only contain alphabets and numbers, and it should not be blank |
KEYWORD |
The name or part of the name you’re using to search for a patient. | Must be a string |
TAB_NUMBER |
The target tab to switch to. 1: Patients Tab 2: Medical History Tab 3: Appointments Tab |
Must only be an integer |
5. Features ⭐️
![]() Notes about the command format:
Notes about the command format:
-
Words in
UPPER_CASEare the parameters to be supplied by you.
For example, inadd n/NAME,NAMEis a parameter which can be used asadd n/John Doe. -
Optional items are in square brackets.
For example,n/NAME [t/TAG]can be used asn/John Doe t/friendor asn/John Doe. -
Repeating items marked with
…can be used multiple times.
For example,[t/TAG]…can be used ast/malaria,t/asthma t/malariaor not at all. -
Parameters can be in any order.
For instance,n/NAME p/PHONE_NUMBERis also acceptable asp/PHONE_NUMBER n/NAME. -
Extraneous parameters for commands that do not require them such as
helpexitandclearwill be ignored.
For instance,help 123will be interpreted ashelp.
❗Warning: The clear command will erase all data from the .json file and the action cannot be undone. Please use with caution.
💡Tip for PDF users: Be mindful when copying and pasting commands from the PDF as spaces around line breaks may be lost.
5.1. Patients Related Features 🚑
5.1.1. Create Patient Record 📝🚑
What it does
This command allows you to add a new patient record into the CareCentral system, keeping track of all the essential details for each patient.
Command Format
add-patient n/NAME ic/NRIC a/AGE p/PHONE_NUMBER e/EMAIL [t/TAG]…
Example Commands
Here’s an example to add a patient named John Doe:
add-patient n/John Doe ic/S0123456A a/45 p/12341234 e/johndoe@example.com
Parameters
Let’s break down what each part of the command means:
| Parameters | Explanations | Constraints |
|---|---|---|
n/NAME |
Full name of the patient | Must only contain alphanumeric characters and spaces, and it should not be blank |
ic/NRIC |
NRIC of the patient | Must be alphanumeric as per Singapore standards. Details here |
a/AGE |
Age of the patient | Must be a positive integer |
p/PHONE_NUMBER |
Phone number of the patient | Must be entirely numeric and exactly 8 digits long |
e/email |
Email address of the patient | Must be a valid email address |
[t/TAG]... |
Information that is related to the patient | Alphanumeric characters only and no spaces |
5.1.2. List Patients 📋🚑
What it does
This command gives you the big picture, listing out all patients currently saved in the CareCentral system.
Command Format
Just type this simple command to get the full list of patients:
list-patients
5.1.3. Edit Patient Record ✏️🚑
What it does
This command allows you to edit existing patient information at the specified PATIENT_INDEX in the system.
Command Format
edit-patient PATIENT_INDEX [n/NAME] [ic/NRIC] [a/AGE] [p/PHONE_NUMBER] [e/EMAIL] [t/TAG]…
Example Commands
Here’s an example to edit the patient record at index 5:
edit-patient 5 n/John Doe ic/S0123456A a/45 p/12341234 e/johndoe@example.com t/critical
Editing patient tags will override all the patient's existing tags.
e.g.
edit-patient 5 t/critical will remove all the patient's existing tags and replace it with critical.
Parameters
Let’s break down what each part of the command means:
| Parameters | Explanations | Constraints |
|---|---|---|
PATIENT_INDEX |
Index of the patient in the displayed patient list. Can refer to patients tab to find out about the patient’s index | Must be a positive integer |
[n/NAME] |
Full name of the patient | Must only contain alphanumeric characters and spaces, and it should not be blank |
[p/PHONE_NUMBER] |
Phone number of the patient | Must be entirely numeric and exactly 8 digits long |
[ic/NRIC] |
NRIC of the patient | Must be alphanumeric as per Singapore standards. Details here |
[a/AGE] |
Age of the patient | Must be a positive integer |
[e/EMAIL] |
Email address of the patient | Must be a valid email address |
[t/TAG]... |
Information that is related to the patient | Alphanumeric characters only and no spaces |
5.1.4. Delete Patient Record 🗑️🚑
What it does
This command allows you to remove a patient’s record from the system. The specific patient is found by the PATIENT_INDEX as shown in the list from list-patients.
Be aware: This action will permanently erase the patient’s record, including all related appointments and medical history.
Command Format
delete-patient PATIENT_INDEX
Example Commands
Here’s an example to delete the patient record at index 2:
delete-patient 2
Parameters
Let’s break down what each part of the command means:
| Parameters | Explanations | Constraints |
|---|---|---|
PATIENT_INDEX |
Index of the patient in the displayed patient list. Can refer to patients tab to find out about the patient’s index | Must be a positive integer |
Final Reminder
When using this command, ensure that the patient index corresponds to a valid patient in your system to prevent accidental deletion.
5.1.5. Find Patient Record 🔎🚑
What it does
This command helps you to locate a patient’s record in the system by searching for a keyword. The search functionality is designed to match complete or starting fragments of the name. For instance, searching for John will show John Doe but not Johnny.
Command Format
find KEYWORD
Example Commands
This example means that it will fetch the record for any patient named John Doe:
find John Doe
Parameters
Let’s break down what each part of the command means:
| Parameters | Explanations | Constraints |
|---|---|---|
KEYWORD |
The name or part of the name you’re using to search for a patient. | Must be a string |
5.2. Appointments Related Features 📅
Our system supports recording of both past and future appointments to facilitate comprehensive schedule management. This functionality is crucial for maintaining accurate records of patient visits and planning ahead for future appointments.
5.2.1. Add Appointment 📝📅
What it does
This command allows you to schedule new appointments for patients.
Command Format
add-appt PATIENT_INDEX d/DATE t/TIME
Example Commands
This example schedules an appointment for the patient at index 1 for October 1st, 2023, at 2:00 PM:
add-appt 1 d/2023-10-01 t/14:00
Parameters
Let’s break down what each part of the command means:
| Parameters | Explanations | Constraints |
|---|---|---|
PATIENT_INDEX |
Index of the patient in the displayed patient list. Can refer to patients tab to find out about the patient’s index | Must be a positive integer |
d/DATE |
Date of the appointment | Must be in the format YYYY-MM-DD |
t/TIME |
Time of the appointment | Must be in the format HH:MM (24-hour format) |
5.2.2. List All Appointments 📋📅
This feature is dependent on having existing patient records. For example, using
list-appointments 1 will show all appointments for the patient with index 1. If no patients are recorded, please add a patient to the system first.What it does
This command allows you to display a list of all appointments for a specific patient.
Command Format
list-appointments PATIENT_INDEX
Example Commands
To view all appointments for the patient at index 1:
list-appointments 1
Parameters
Let’s break down what each part of the command means:
| Parameters | Explanations | Constraints |
|---|---|---|
PATIENT_INDEX |
Index of the patient in the displayed patient list. Can refer to patients tab to find out about the patient’s index | Must be a positive integer |
Final Reminder
When using this command, ensure that the patient index corresponds to a valid patient in your system to view their appointment details.
5.2.3. Edit Appointment ✏️📅
- This command should only be used after
list-appointments PATIENT_INDEX. - Make sure to select the correct patient's appointments with
list-appointments PATIENT_INDEXbefore attempting an edit.
What it does
This command allows you to edit existing appointment details. The appointment to be edited is identified by the index number shown in the displayed list of appointments by list-appointments.
Command Format
edit-appt APPOINTMENT_INDEX pi/patient-index [d/DATE] [t/TIME]
Example Commands
To change the details of the second appointment for the patient at index 7 to October 5th, 2023, at 4:00 PM:
edit-appt 2 pi/7 d/2023-10-05 t/16:00
Tutorial:
Step 1: Listing the appointments of the patient:
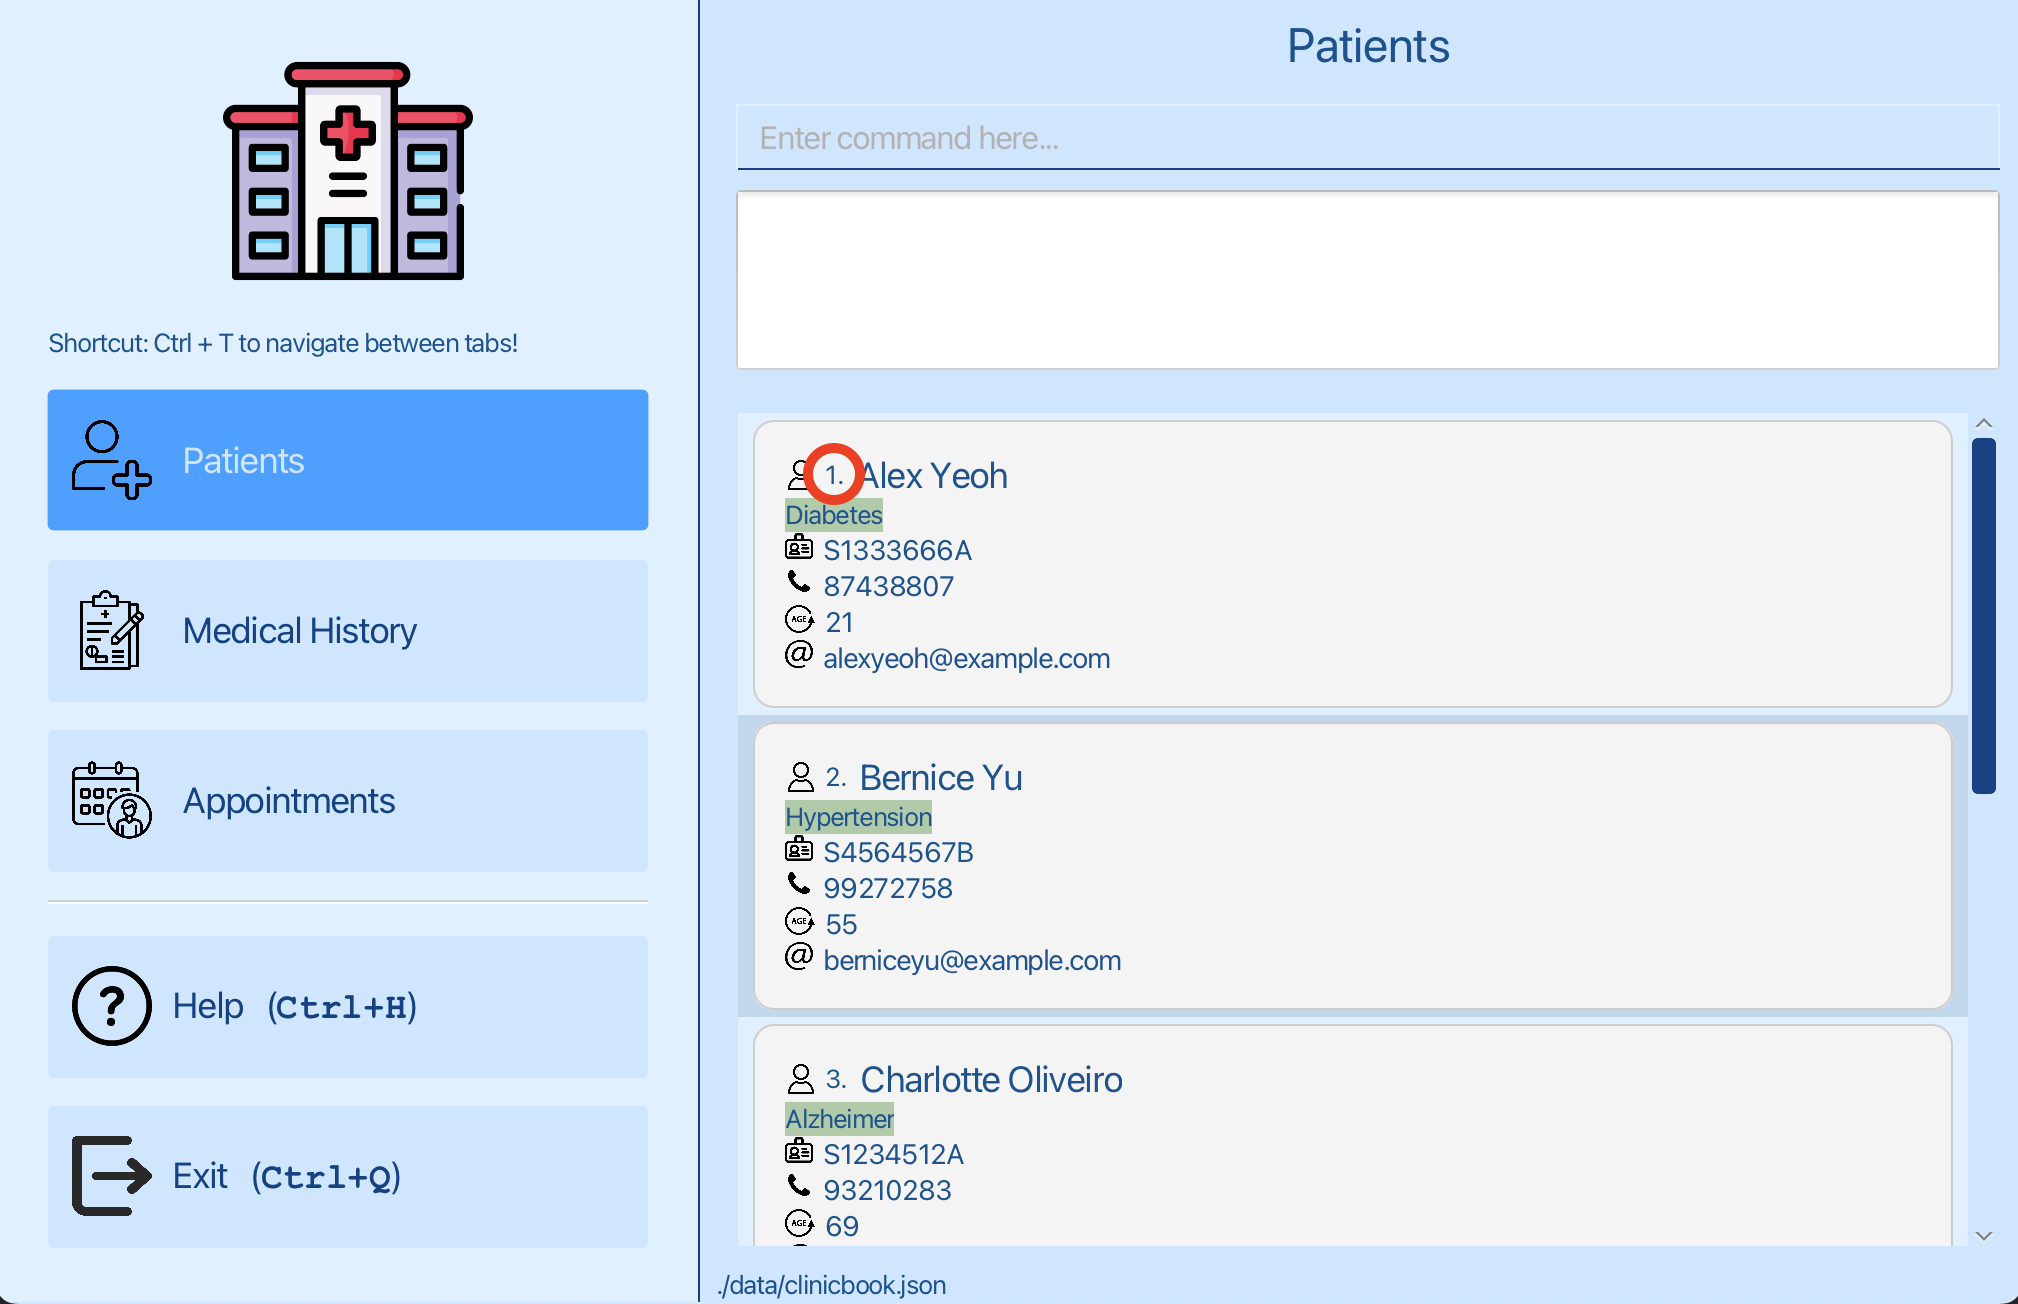
You want to edit an appointment for Alex Yeoh. You can see that the patient Alex Yeoh has an index of 1 in the patient list. Now you can switch to the appointments tab.
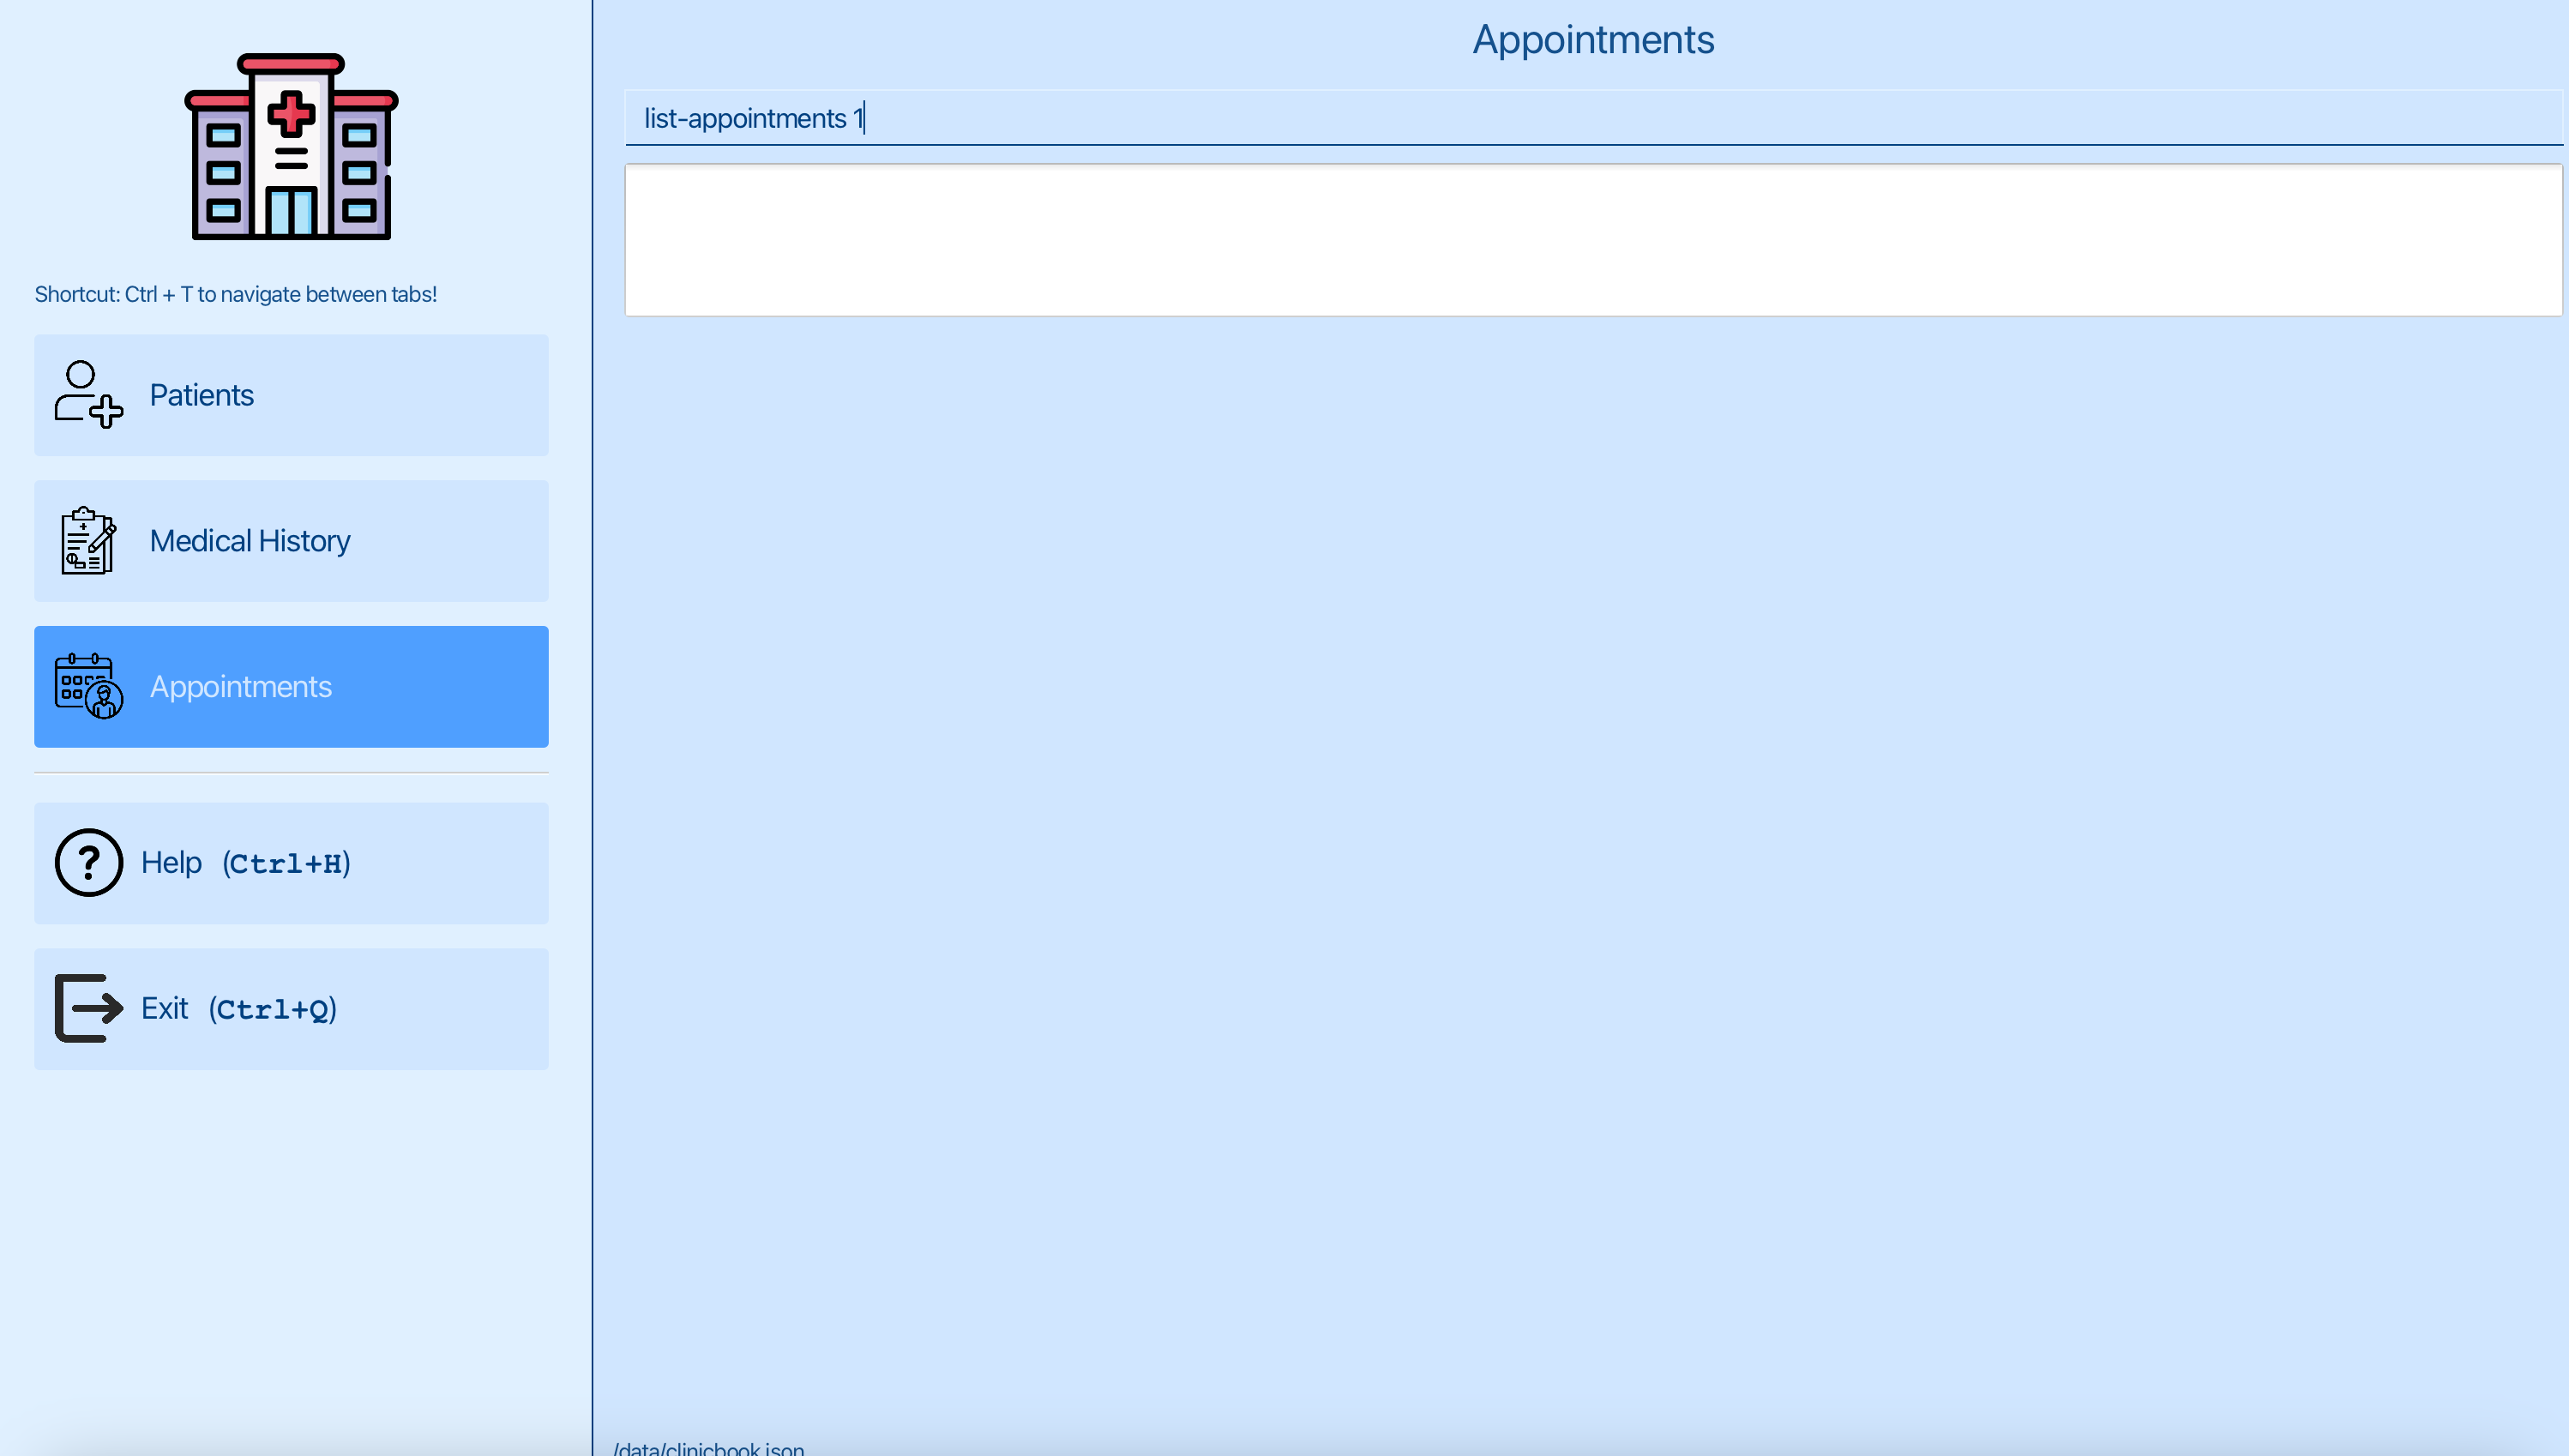
You can now list the appointments of the patient at index 1 using list-appointments 1 , where 1 is the index of Alex Yeoh.
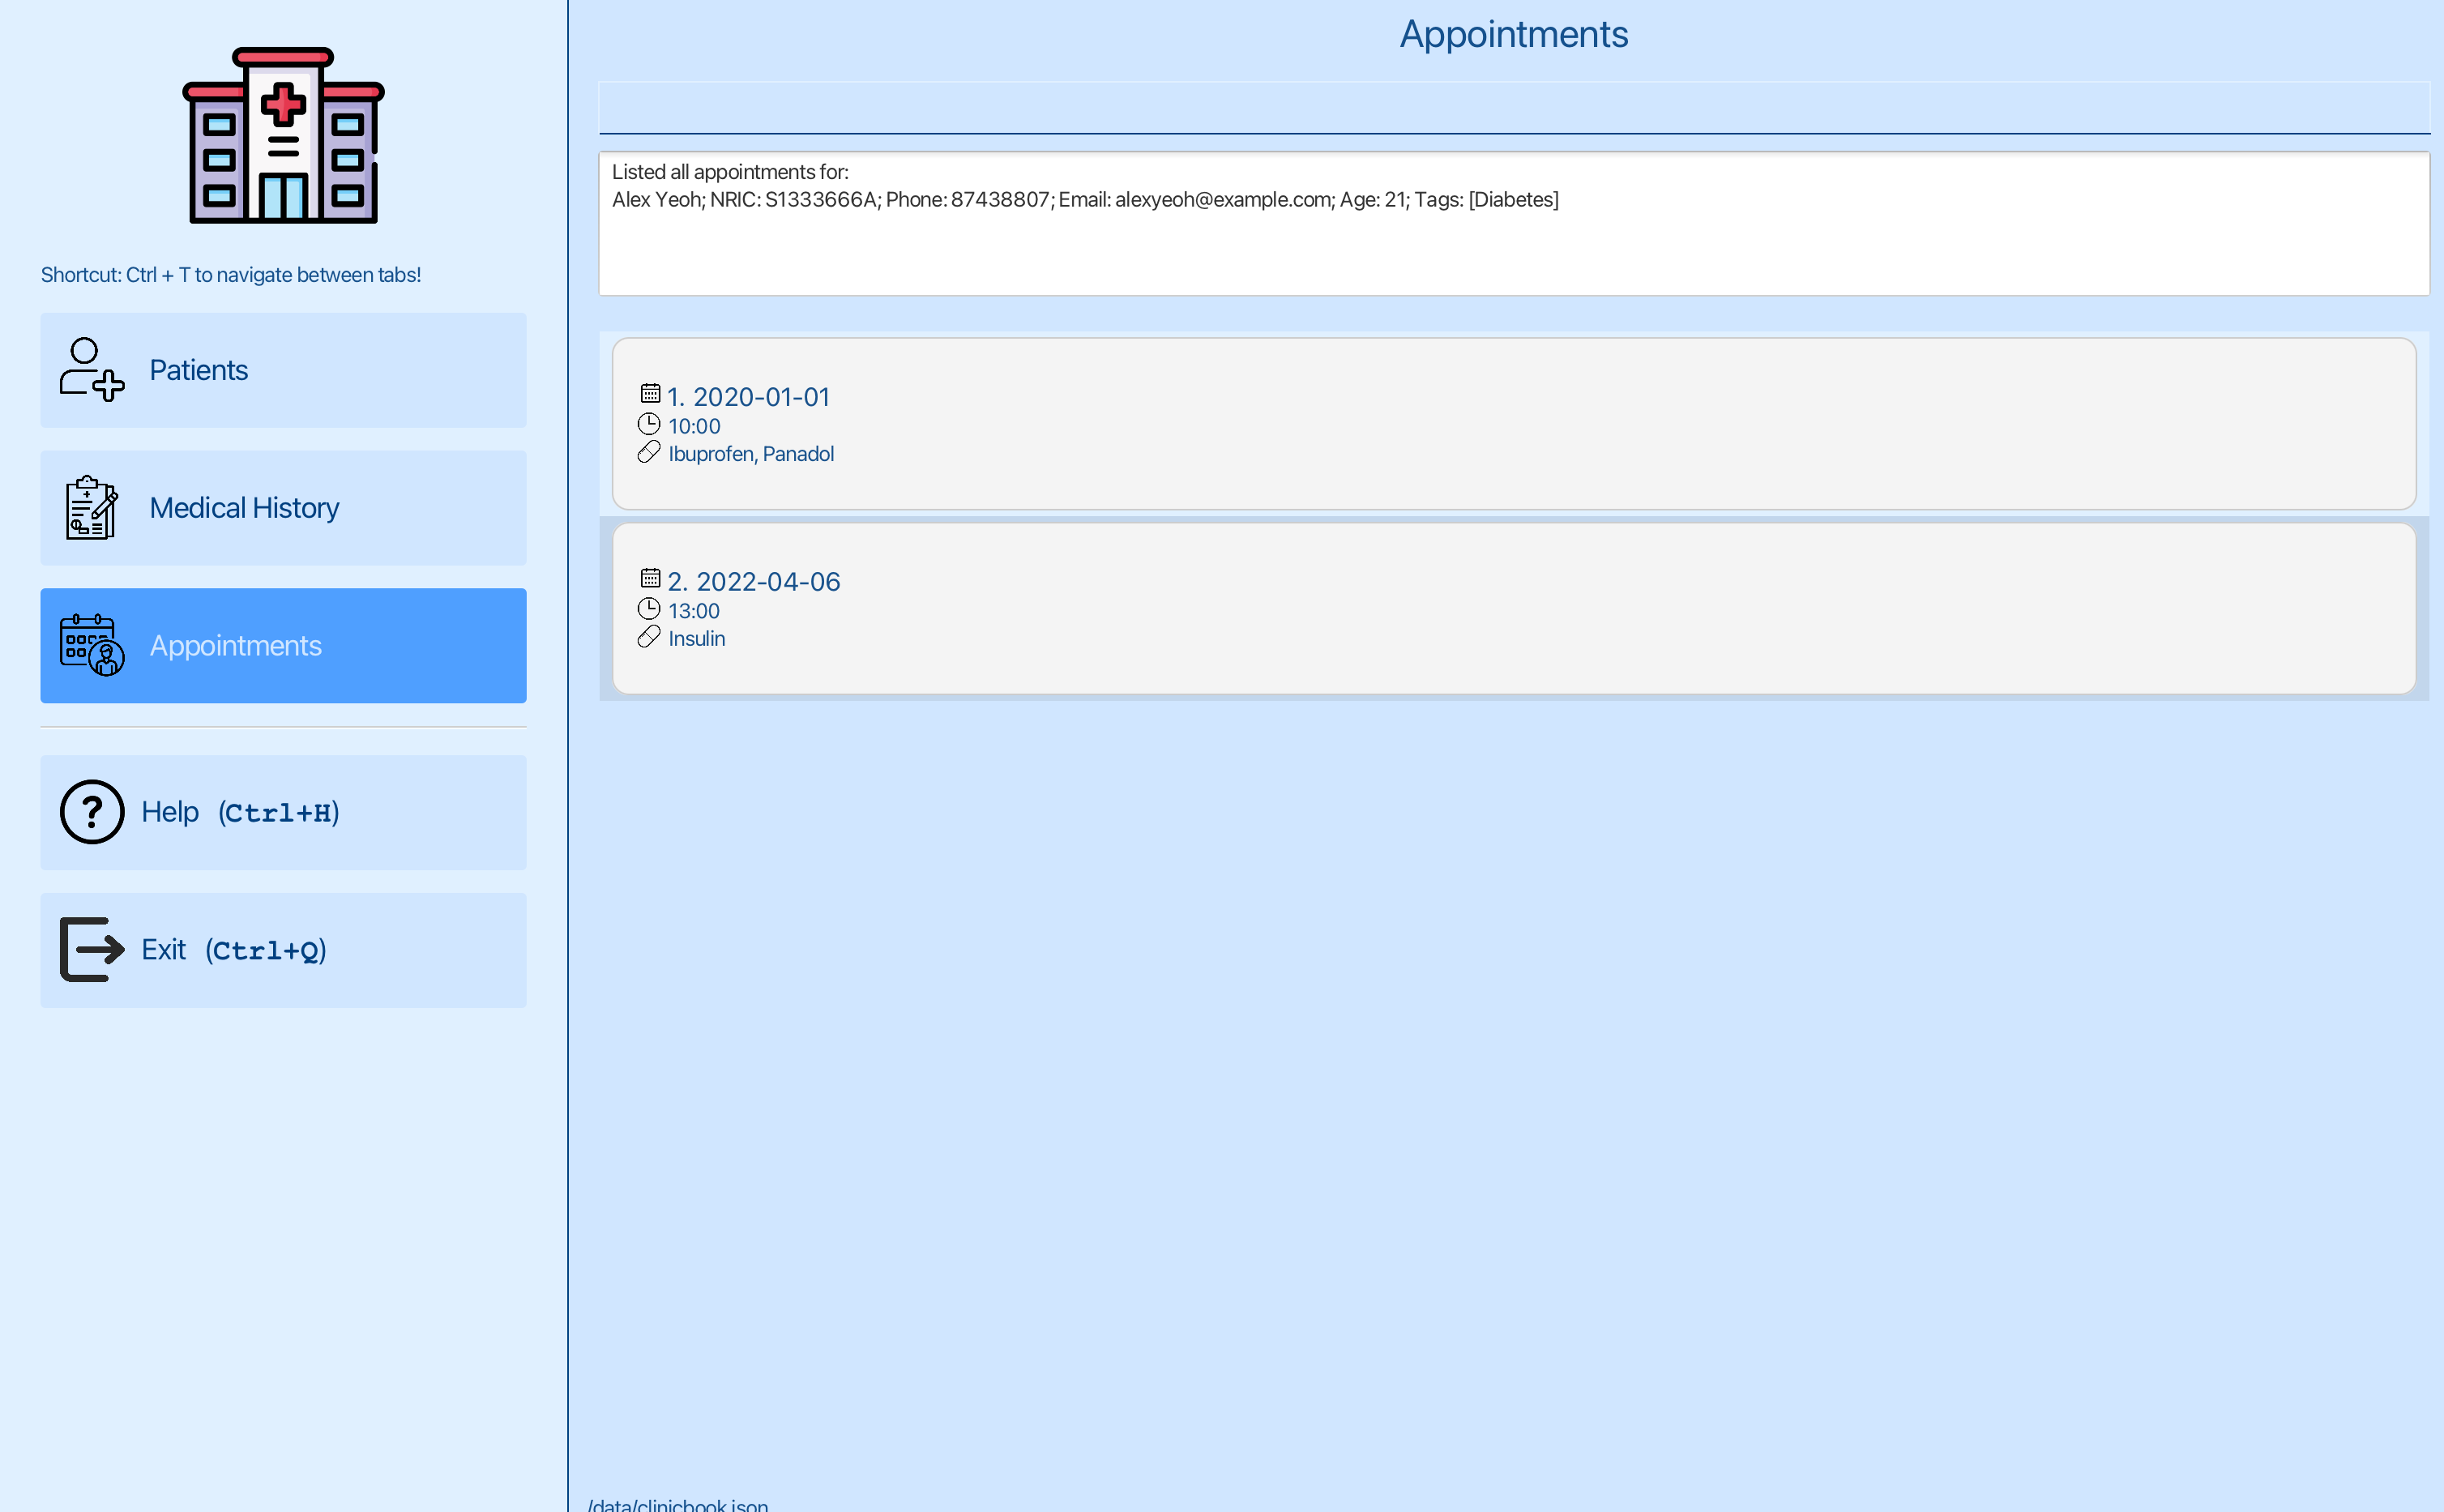
You can see the list of appointments for Alex Yeoh. You want to edit the date of the second appointment for Alex Yeoh.
Step 2: Editing the appointment for Alex Yeoh:
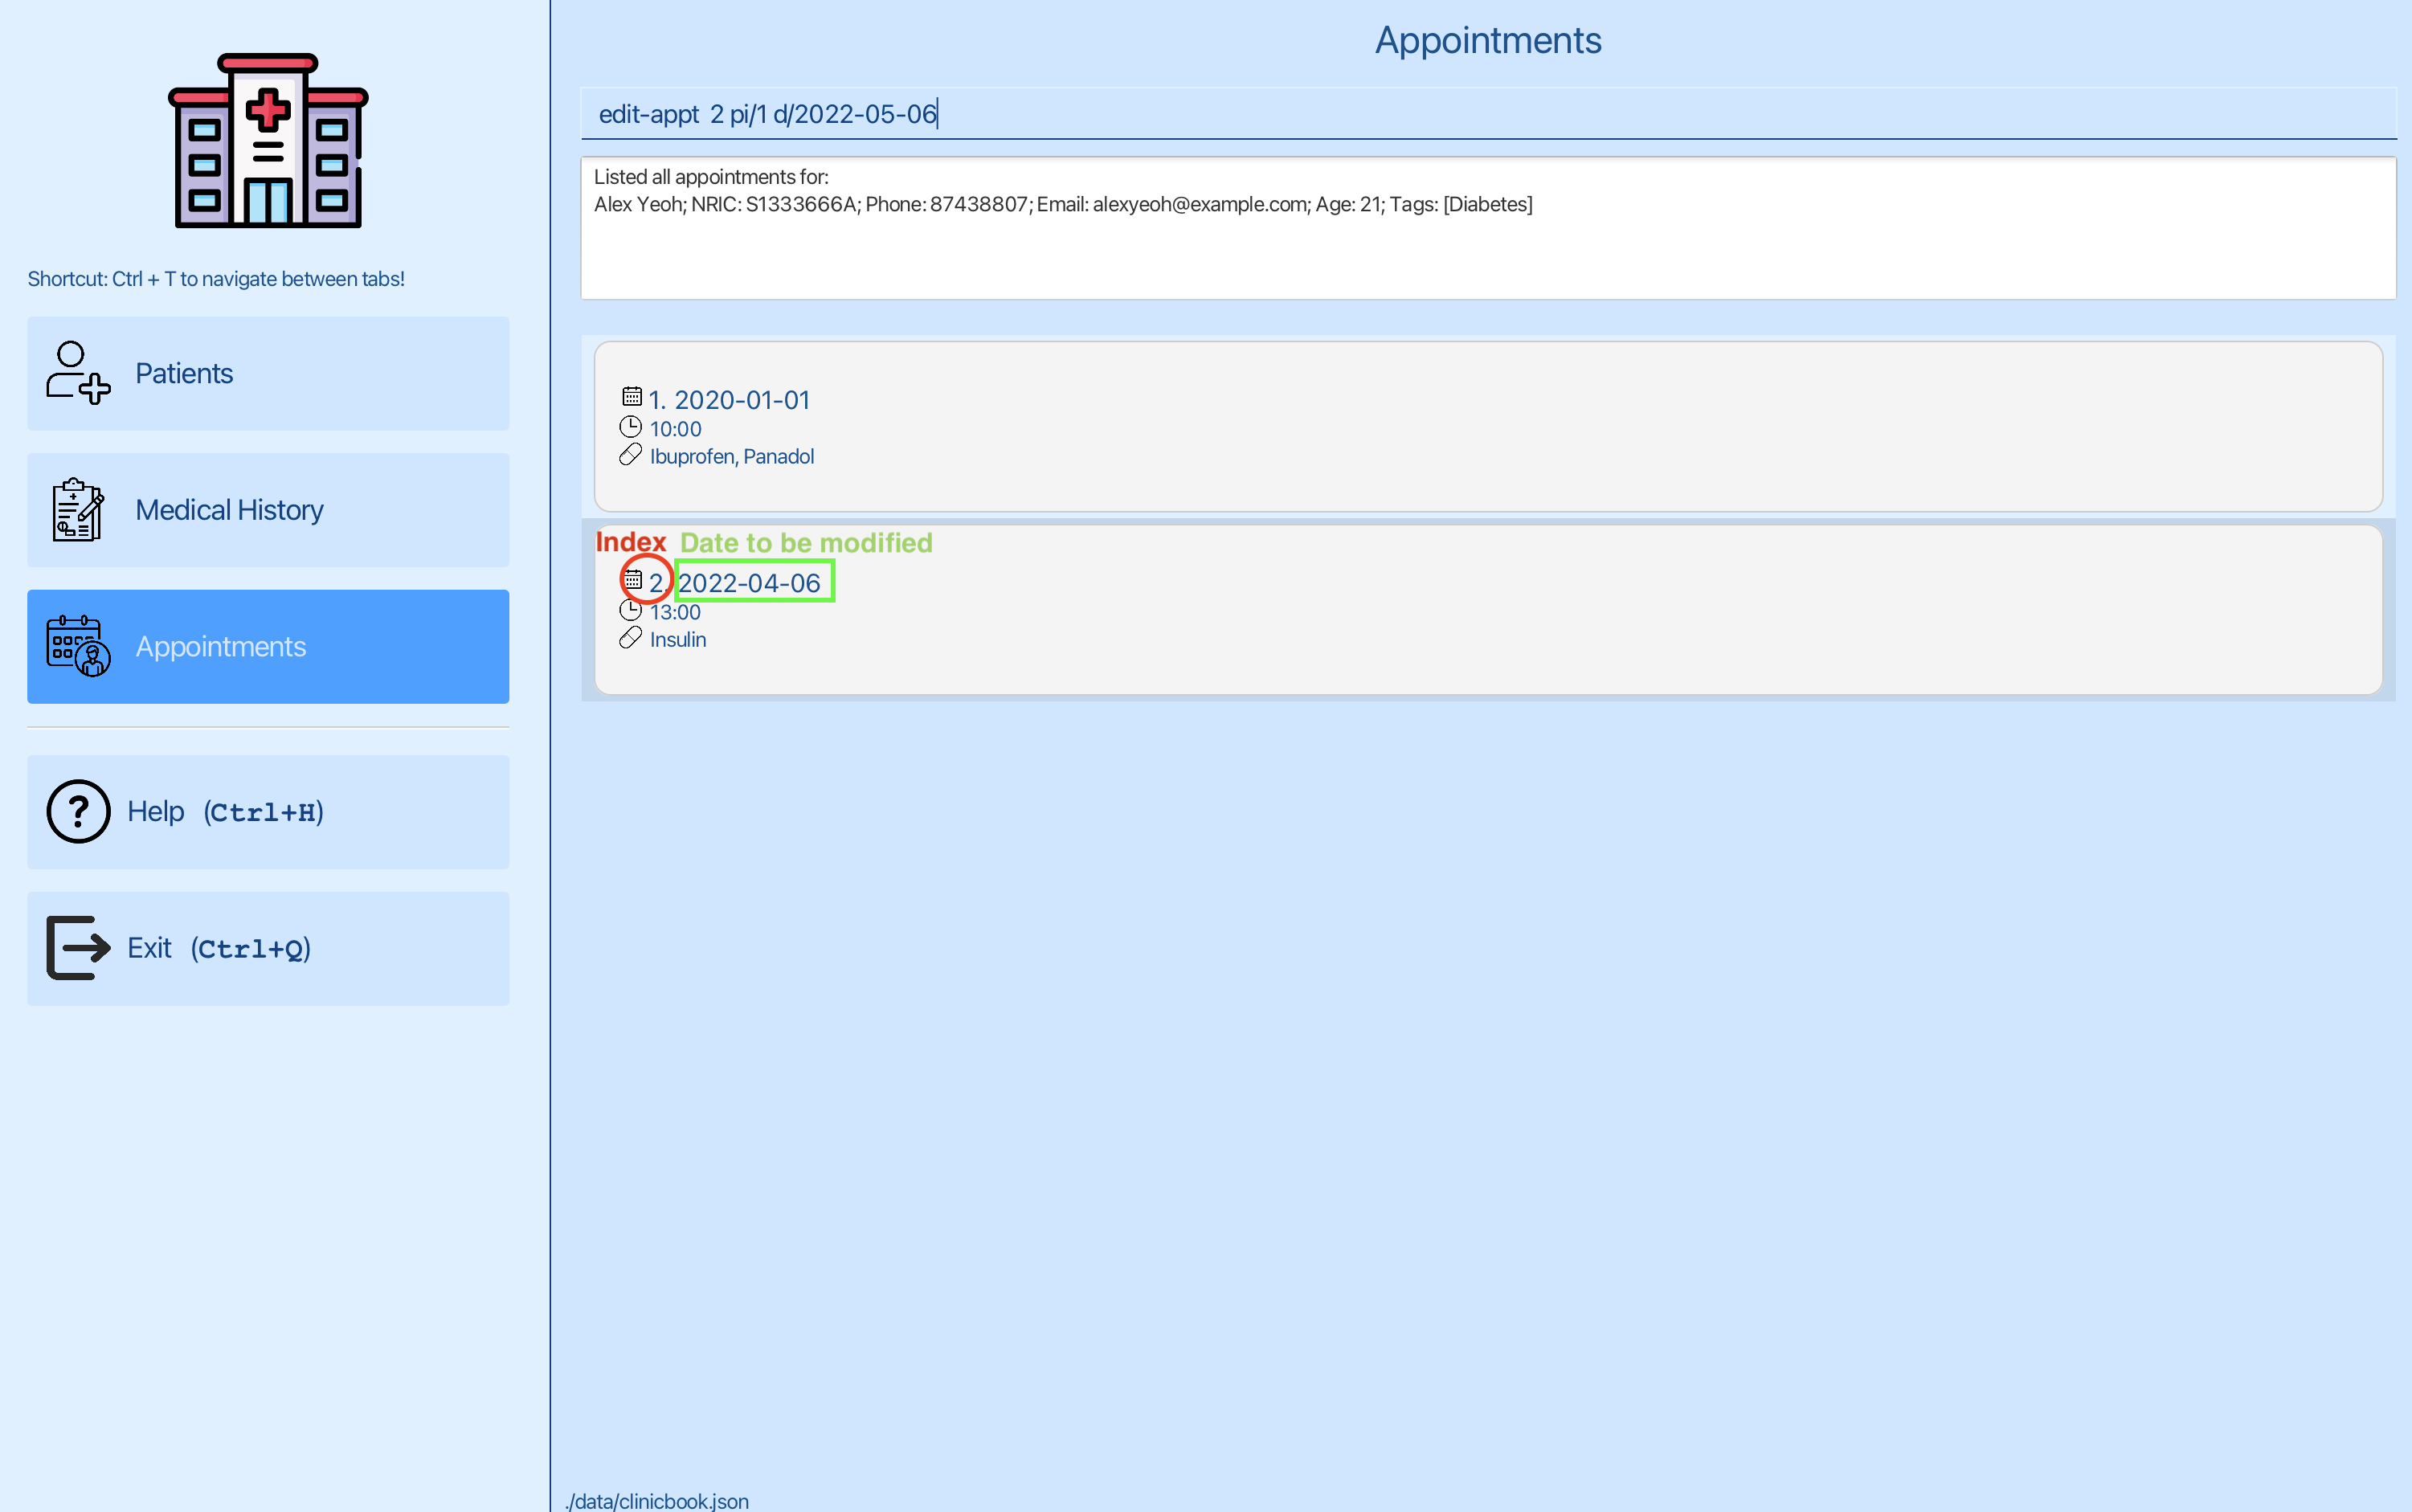
You can now edit the date of the first appointment using edit-appt 2 pi/1 d/2022-05-06, where 2 is the index of the second appointment and 1 is the index of Alex Yeoh.
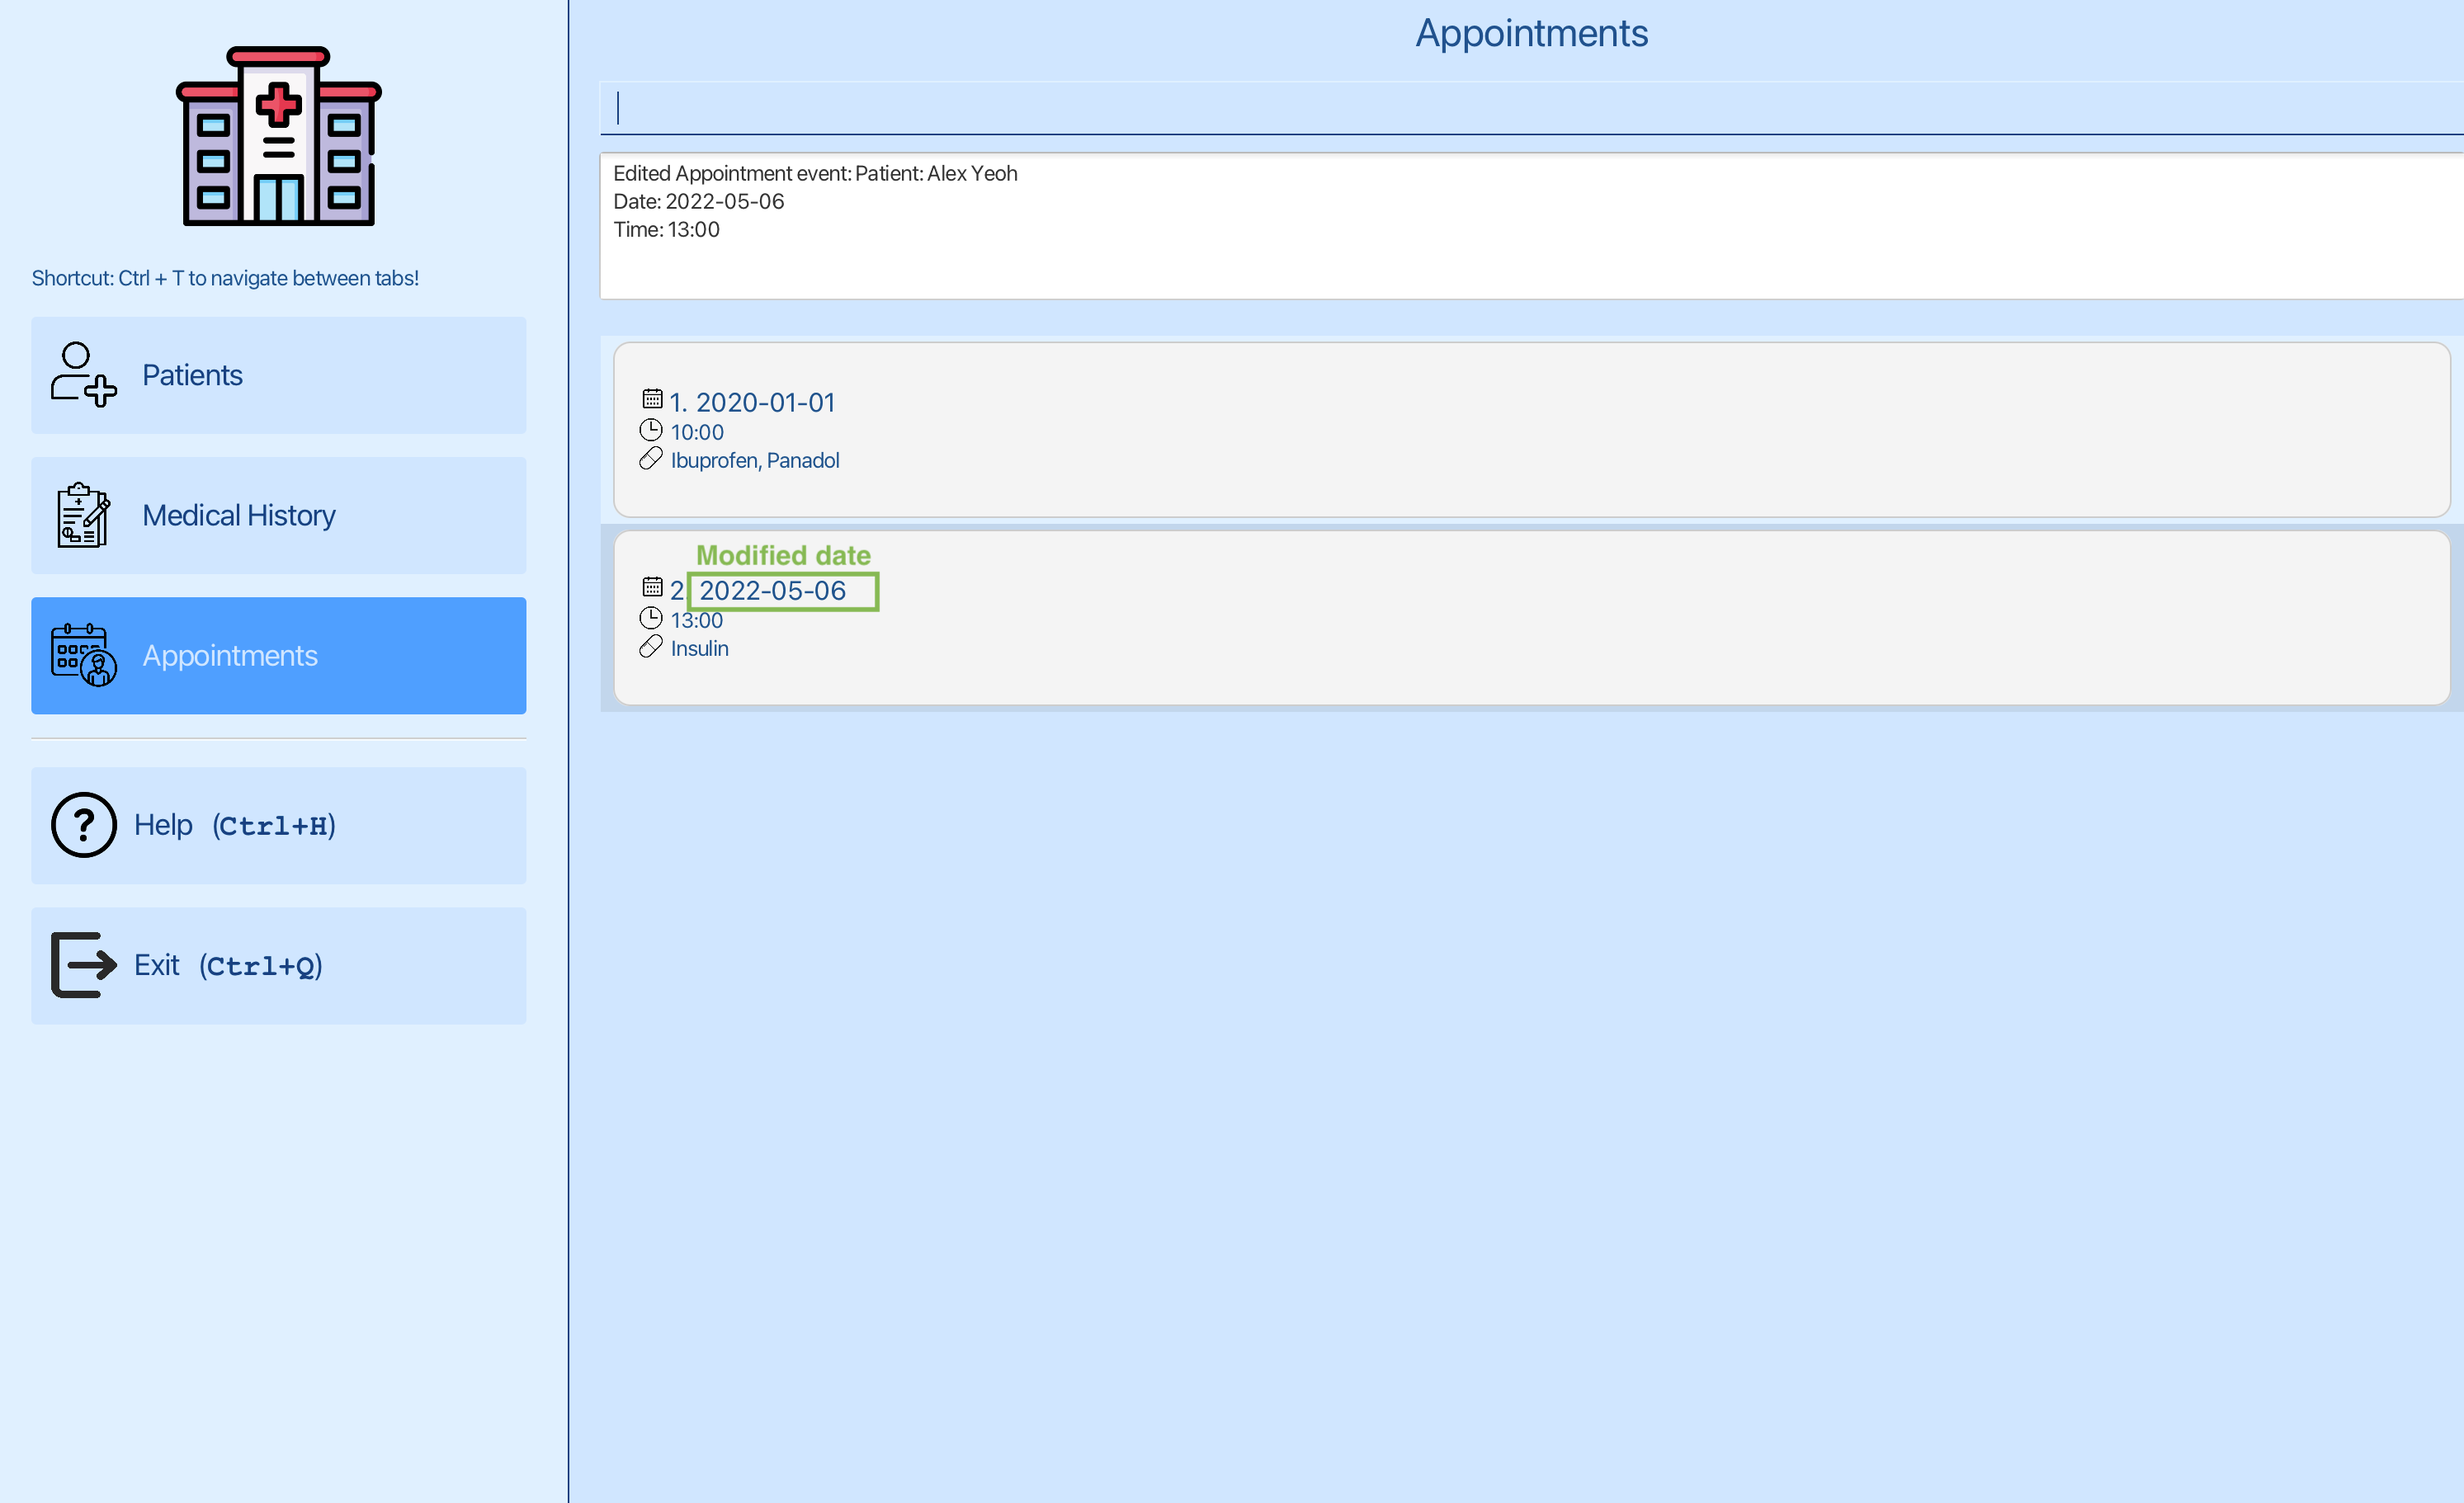
You can see that the date of the second appointment has been edited to 2022-05-06.
To ensure you are editing the correct appointment:
- Use
list-appointments PATIENT_INDEXto view a specific patient's appointments. - The command
edit-appt 2 pi/1 d/2023-10-05 t/16:00will update the second-listed appointment for patient index 1. - To edit appointments for a different patient, first list their appointments using their unique patient index with the command
list-appointments PATIENT_INDEX. - The patient index can be confirmed via the patients tab.
Parameters
Let’s break down what each part of the command means:
| Parameters | Explanations | Constraints |
|---|---|---|
APPOINTMENT_INDEX |
Index of the appointment in the displayed appointment list | Must be a positive integer |
pi/PATIENT_INDEX |
Index of the patient in the displayed patient list. Can refer to patients tab to find out about the patient’s index | Must be a positive integer |
[d/DATE] |
Date of the appointment | Must be in the format YYYY-MM-DD |
[t/TIME] |
Time of the appointment | Must be in the format HH:MM (24-hour format) |
Final Reminder
Remember to verify the appointment index and patient index before making changes to prevent any unintended schedule updates.
5.2.4. Delete Appointment 🗑️📅
Make sure to select the correct patient's appointments with
list-appointments PATIENT_INDEX before attempting a deletion.
What it does
This command allows you to remove an appointment from the system. The appointment to be deleted is identified by the index number shown in the displayed list of appointments by list-appointments.
Command Format
delete-appt APPOINTMENT_INDEX pi/patient-index
Example Commands
To delete the third appointment for the patient at index 2:
delete-appt 3 pi/2
Tutorial:
Step 1: Listing the appointments of the patient:

You want to delete an appointment for Alex Yeoh. You can see that the patient Alex Yeoh has an index of 1 in the patient list. Now you can switch to the appointments tab.

You can now list the appointments of the patient at index 1 using list-appointments 1 , where 1 is the index of Alex Yeoh.

You can see the list of appointments for Alex Yeoh. You want to delete the first appointment for Alex Yeoh.
Step 2: Deleting the appointment for Alex Yeoh:
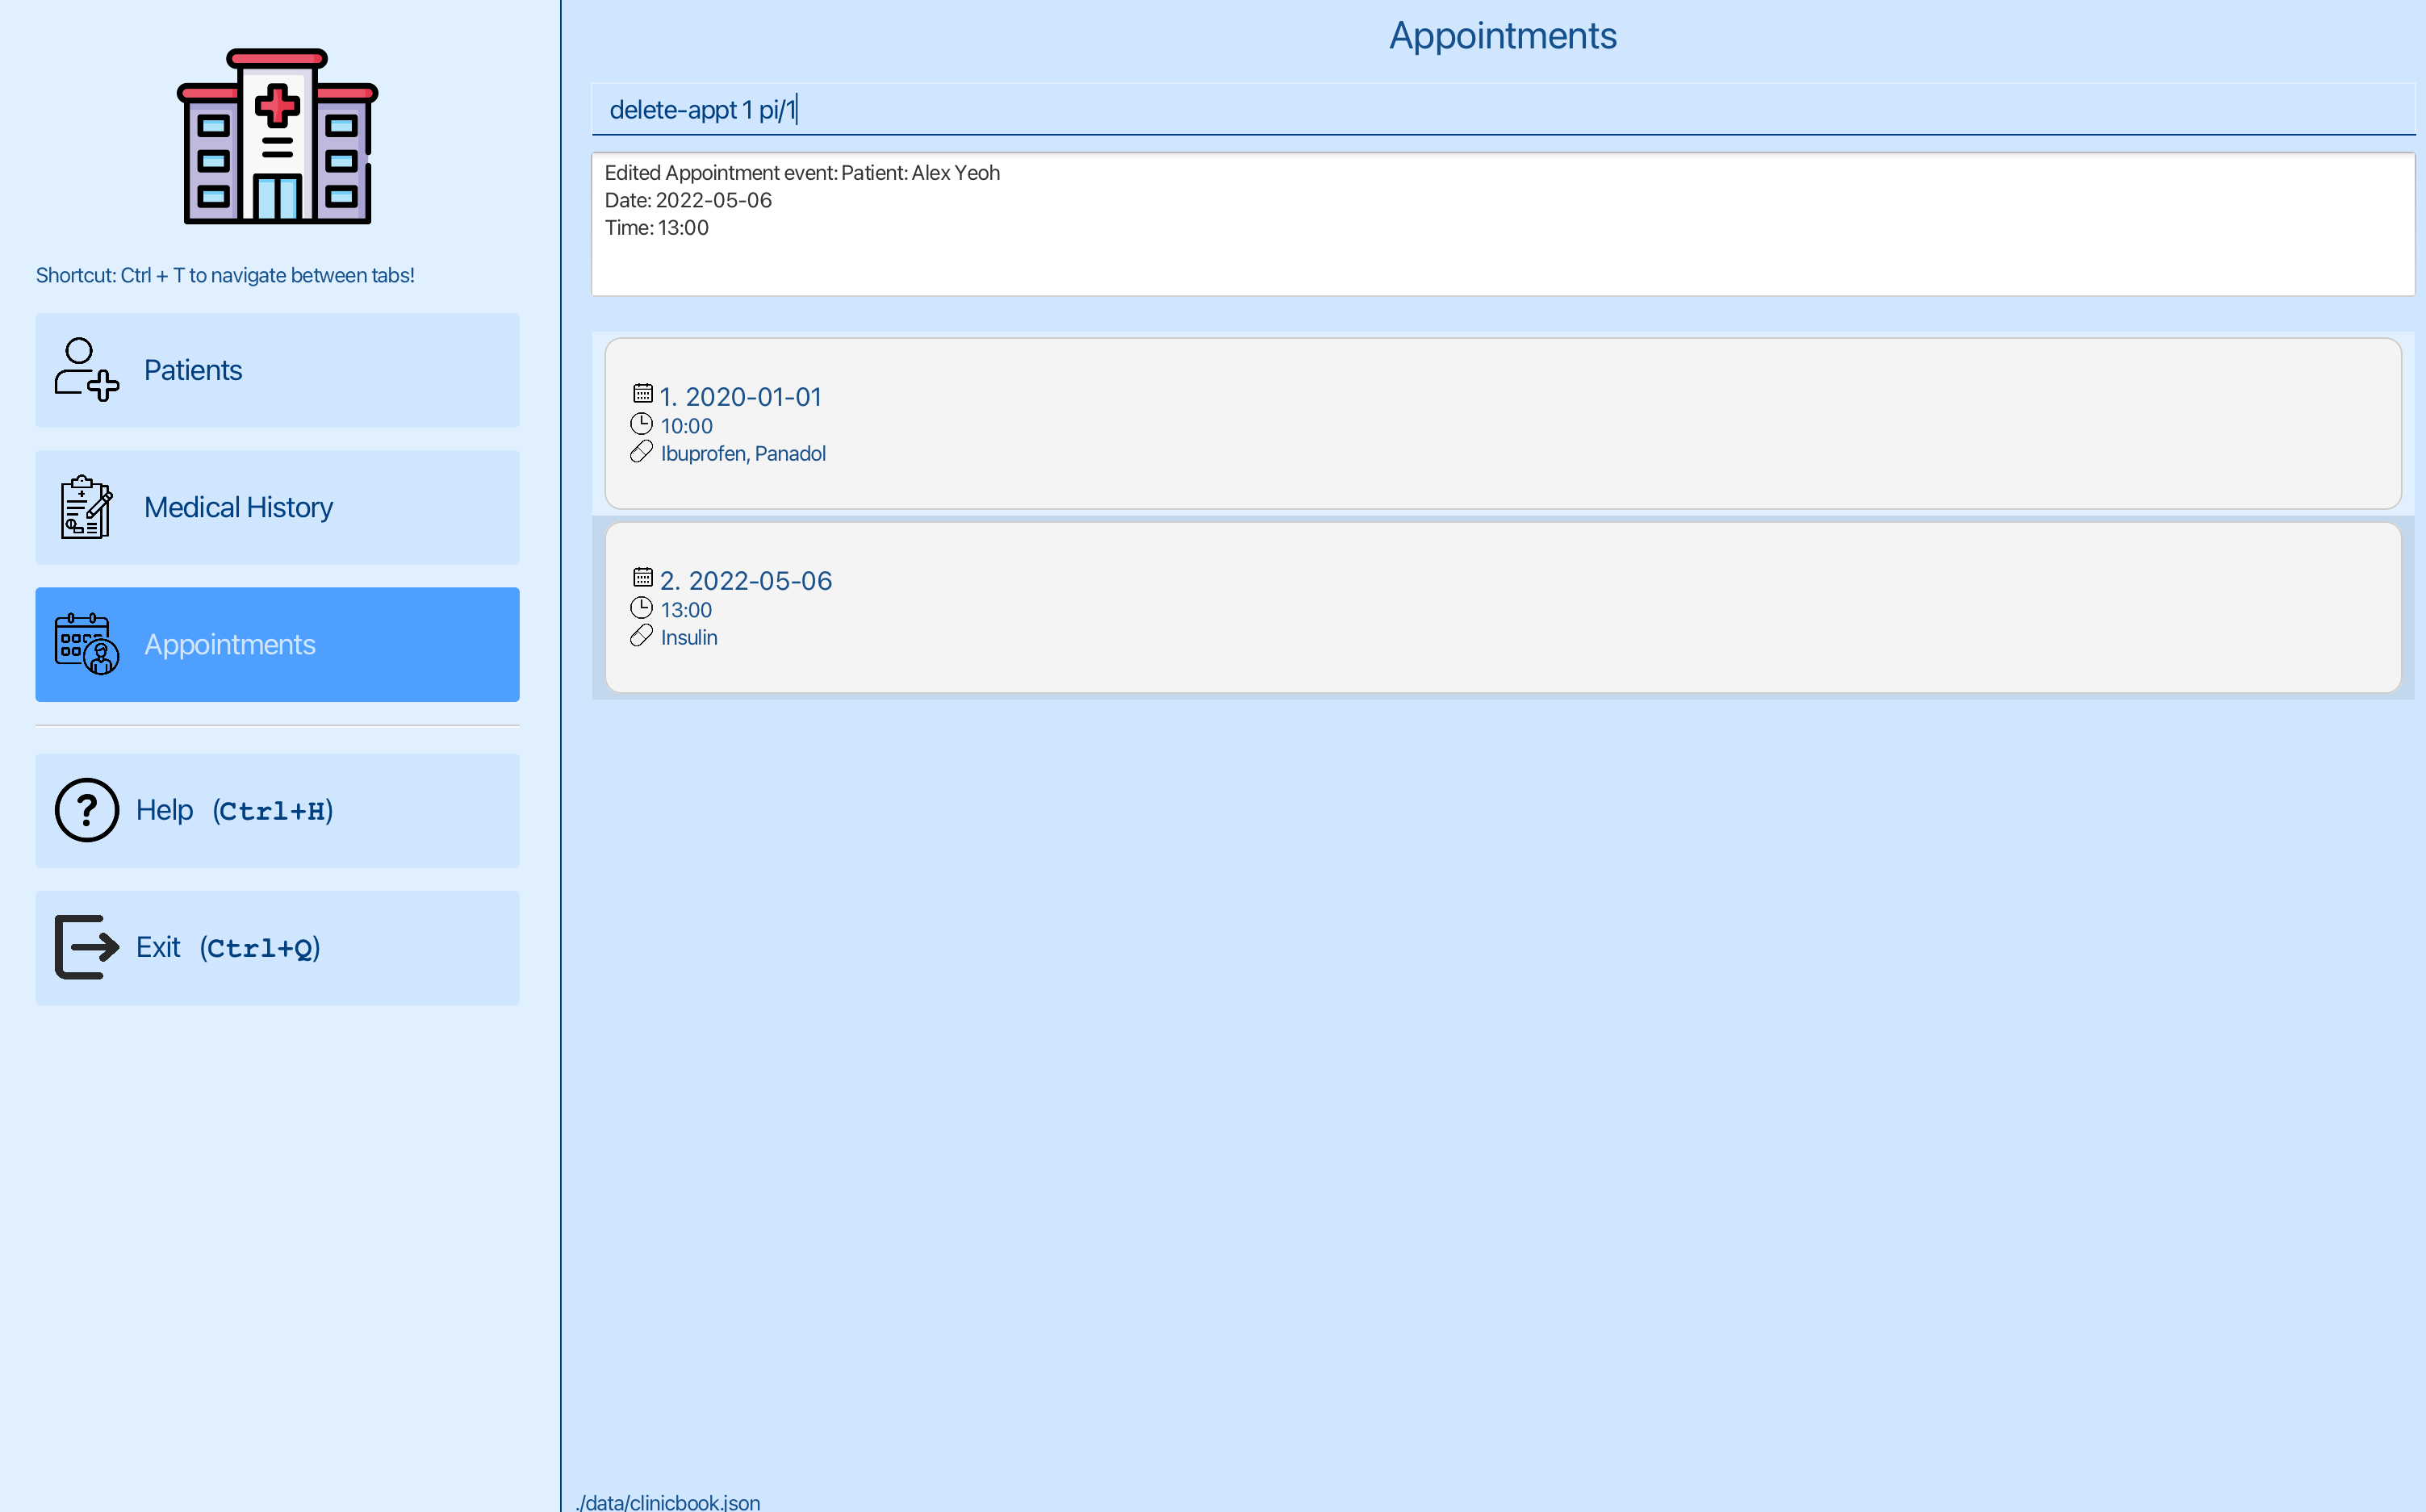
You can now delete the date of the first appointment using delete-appt 1 pi/1, where 1 is the index of the first appointment and 1 is the index of Alex Yeoh.
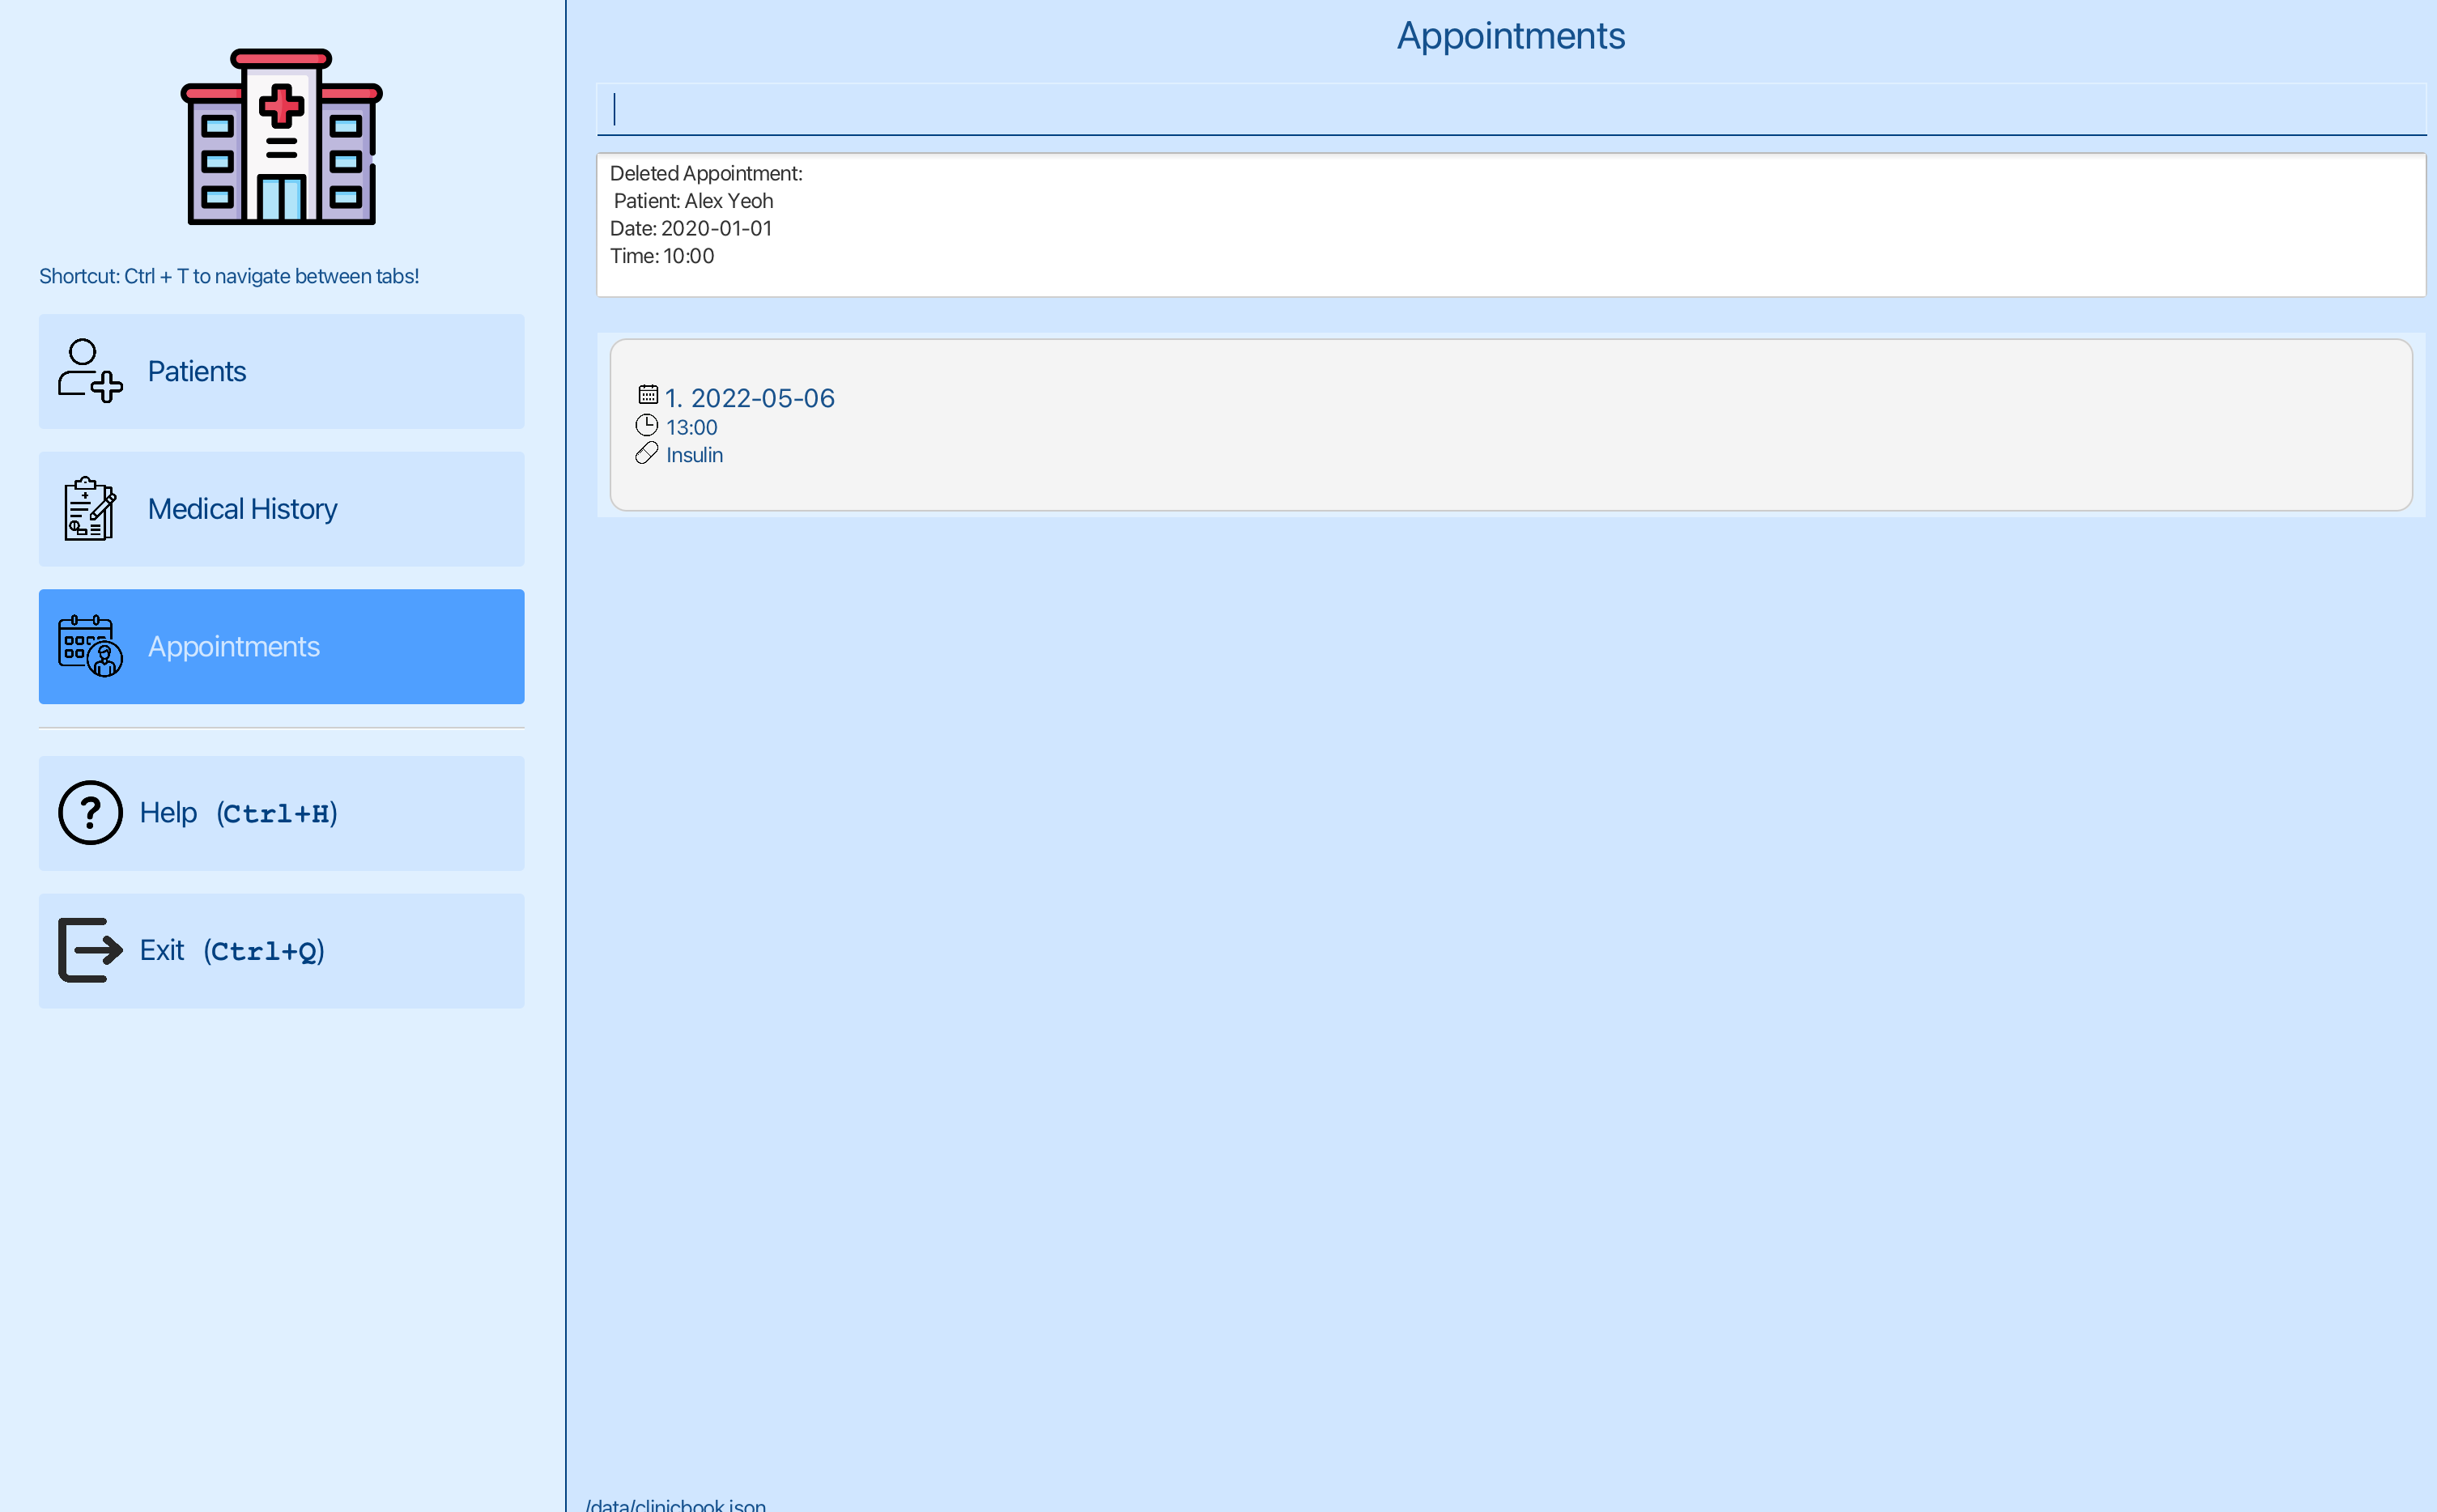
You can see that the first appointment has been deleted.
Parameters
Let’s break down what each part of the command means:
| Parameters | Explanations | Constraints |
|---|---|---|
APPOINTMENT_INDEX |
Index of the appointment in the displayed appointment list | Must be a positive integer |
pi/PATIENT_INDEX |
Index of the patient in the displayed patient list. Can refer to patients tab to find out about the patient’s index | Must be a positive integer |
Final Reminder
Please double-check the appointment and patient indexes before executing this command to avoid removing the wrong appointment.
5.2.5. Add Prescription 📝💊
- This command should only be used after
list-appointments PATIENT_INDEX - This feature is dependent on having existing patient records & appointments. For example, using
list-appointments 1will show all appointments for the patient with index 1. If no patients are recorded, please add a patient to the system first. Similarly, if there is no appointments associated with the patient, please add an appointment to the selected patient first.
What it does
This command allows you to add one or multiple medications to a patient’s appointment record. The appointment to be edited is identified by the index number shown in the displayed list of appointments by list-appointments.
Command Format
add-prescription APPOINTMENT_INDEX pi/PATIENT_INDEX mn/MEDICATION_NAME...
Example Commands
To add Paracetamol and Albuterol to the first appointment for the patient at index 1:
add-prescription 1 pi/1 mn/Paracetamol mn/Albuterol
Parameters Let’s break down what each part of the command means:
| Parameters | Explanations | Constraints |
|---|---|---|
APPOINTMENT_INDEX |
Index of the appointment in the displayed appointment list | Must be a positive integer |
pi/PATIENT_INDEX |
Index of the patient in the displayed patient list. Can refer to patients tab to find out about the patient’s index | Must be a positive integer |
mn/MEDICATION_NAME |
Name of the medication prescribed | must only contain alphanumeric characters, and it should not be blank, can have multiple medication |
5.2.6. Edit Prescription ✏️💊
- This command should only be used after
list-appointments PATIENT_INDEX - This feature is dependent on having existing patient records & appointments. For example, using
list-appointments 1will show all appointments for the patient with index 1. If no patients are recorded, please add a patient to the system first. Similarly, if there is no appointments associated with the patient, please add an appointment to the selected patient first.
What it does
This command allows you to edit a prescription of a patient. The prescription to be edited is identified by the index number shown in the displayed list of appointments by list-appointments.
Command Format
edit-prescription APPOINTMENT_INDEX pi/PATIENT_INDEX mn/MEDICATION_NAME...
Example Commands
To revise the prescription details for the first appointment of patient index 1 to include Panadol, Paracetamol, and Albuterol:
edit-prescription 1 pi/1 mn/Panadol mn/Paracetamol mn/Albuterol
- Prescriptions are linked to specific appointments and can be edited for those displayed from the patient's appointment list.
- Editing a prescription will replace any existing medication list for that appointment with the new entries you provide.
Parameters
Let’s break down what each part of the command means:
| Parameters | Explanations | Constraints |
|---|---|---|
APPOINTMENT_INDEX |
Index of the appointment in the displayed appointment list | Must be a positive integer |
pi/PATIENT_INDEX |
Index of the patient in the displayed patient list. Can refer to patients tab to find out about the patient’s index | Must be a positive integer |
mn/MEDICATION_NAME |
Name of the medication prescribed | Must only contain alphanumeric characters, and it should not be blank, can have multiple medication |
5.2.7. Delete Prescription 🗑️💊
- This command should only be used after
list-appointments PATIENT_INDEX - This feature is dependent on having existing patient records & appointments. For example, using
list-appointments 1will show all appointments for the patient with index 1. If no patients are recorded, please add a patient to the system first. Similarly, if there is no appointments associated with the patient, please add an appointment to the selected patient first.
What it does
This command allows you to remove an appointment’s prescription from the system. The prescription to be deleted is identified by the index number shown in the displayed list of appointments by list-appointments.
Command Format
delete-prescription APPOINTMENT_INDEX pi/PATIENT_INDEX
Example Commands
To delete the prescription linked to the first appointment for patient index 1:
delete-prescription 1 pi/1
Parameters
Let’s break down what each part of the command means:
| Parameters | Explanations | Constraints |
|---|---|---|
APPOINTMENT_INDEX |
Index of the appointment in the displayed appointment list | Must be a positive integer |
pi/PATIENT_INDEX |
Index of the patient in the displayed patient list. Can refer to patients tab to find out about the patient’s index | Must be a positive integer |
Final Reminder
Ensure correct usage of appointment and patient indices to avoid accidental deletion of the wrong prescription.
5.3. Medical History Related Features 📜
5.3.1. Add Medical History 📝📜
- This command should only be used when there is patient(s) in the patient list.
- For instance,
add-medical-history 1 d/2023-10-01 mc/asthma t/ventolinadds the medical history asthma with ventolin as the treatment for the patient with index 1. Make sure to register patients into CareCentral prior to adding their medical records. - For dates, we allow it to be in the past, up until today's date, but not future dates.
What it does
This command allows you to add a medical history to a patient.
Command Format
add-medical-history PATIENT_INDEX d/DATE mc/MEDICAL_CONDITION t/TREATMENT
Example Commands
To add an asthma condition treated with Ventolin on 1st October 2023 for patient index 1:
add-medical-history 1 d/2023-10-01 mc/asthma t/ventolin
Parameters
Let’s break down what each part of the command means:
| Parameters | Explanations | Constraints |
|---|---|---|
PATIENT_INDEX |
Index of the patient in the displayed patient list. Can refer to patients tab to find out about the patient’s index | Must be a positive integer |
d/DATE |
The recorded date when the medical condition was diagnosed or noted | Must be in the format YYYY-MM-DD. Can only be dates earlier than today or today |
mc/MEDICAL_CONDITION |
Medical condition of the patient | Must only contain alphanumeric characters and spaces, and it should not be blank |
t/TREATMENT |
The treatment prescribed or administered for the medical condition. If no treatment, you can write ‘None’ | Must only contain alphanumeric characters and spaces, and it should not be blank |
5.3.2. List Medical History 📋📜
- This command should only be used when there is patient(s) in the patient list.
- For instance,
list-medical-history 1retrieves the medical history for the patient with index 1. Make sure to register patients into CareCentral prior to accessing their medical records.
What it does
This command allows you to list the medical history of a patient, including past diagnoses and treatments.
Command Format
list-medical-history PATIENT_INDEX
Example Commands
To view the complete medical history for the patient at index 1:
list-medical-history 1
Parameters
Let’s break down what each part of the command means:
| Parameters | Explanations | Constraints |
|---|---|---|
PATIENT_INDEX |
Index of the patient in the displayed patient list. Can refer to patients tab to find out about the patient’s index | Must be a positive integer |
Final Reminder
Ensure the patient index corresponds to a valid entry in your patient registry to retrieve accurate medical history information.
5.3.3. Edit Medical History ✏️📜
- This command should only be used when there is patient(s) in the patient list.
- For instance,
edit-medical-history 1 d/2022-10-01will override the current medical history with the date diagnosed to 1st October 2022 for the patient with index 1. Make sure to register patients into CareCentral prior to adding their medical records.
What it does
This command allows you to edit a medical history of a patient. The medical history to be edited is identified by the index number shown in the displayed list of medical history by list-medical-history.
Command Format
edit-medical-history MEDICAL_HISTORY_INDEX pi/PATIENT_INDEX [d/DATE] [mc/MEDICAL_CONDITION] [t/TREATMENT]
Example Commands
To edit an existing medical history entry for patient index 1, changing the condition to asthma and the treatment to Levabuterol on October 1st, 2023:
edit-medical-history 1 pi/1 d/2023-10-01 mc/asthma t/Levabuterol
Tutorial:
Step 1: Listing the medical history of the patient:

You want to edit a medical history entry for Alex Yeoh. You can see that the patient Alex Yeoh has an index of 1 in the patient list. Now you can switch to the medical history tab.
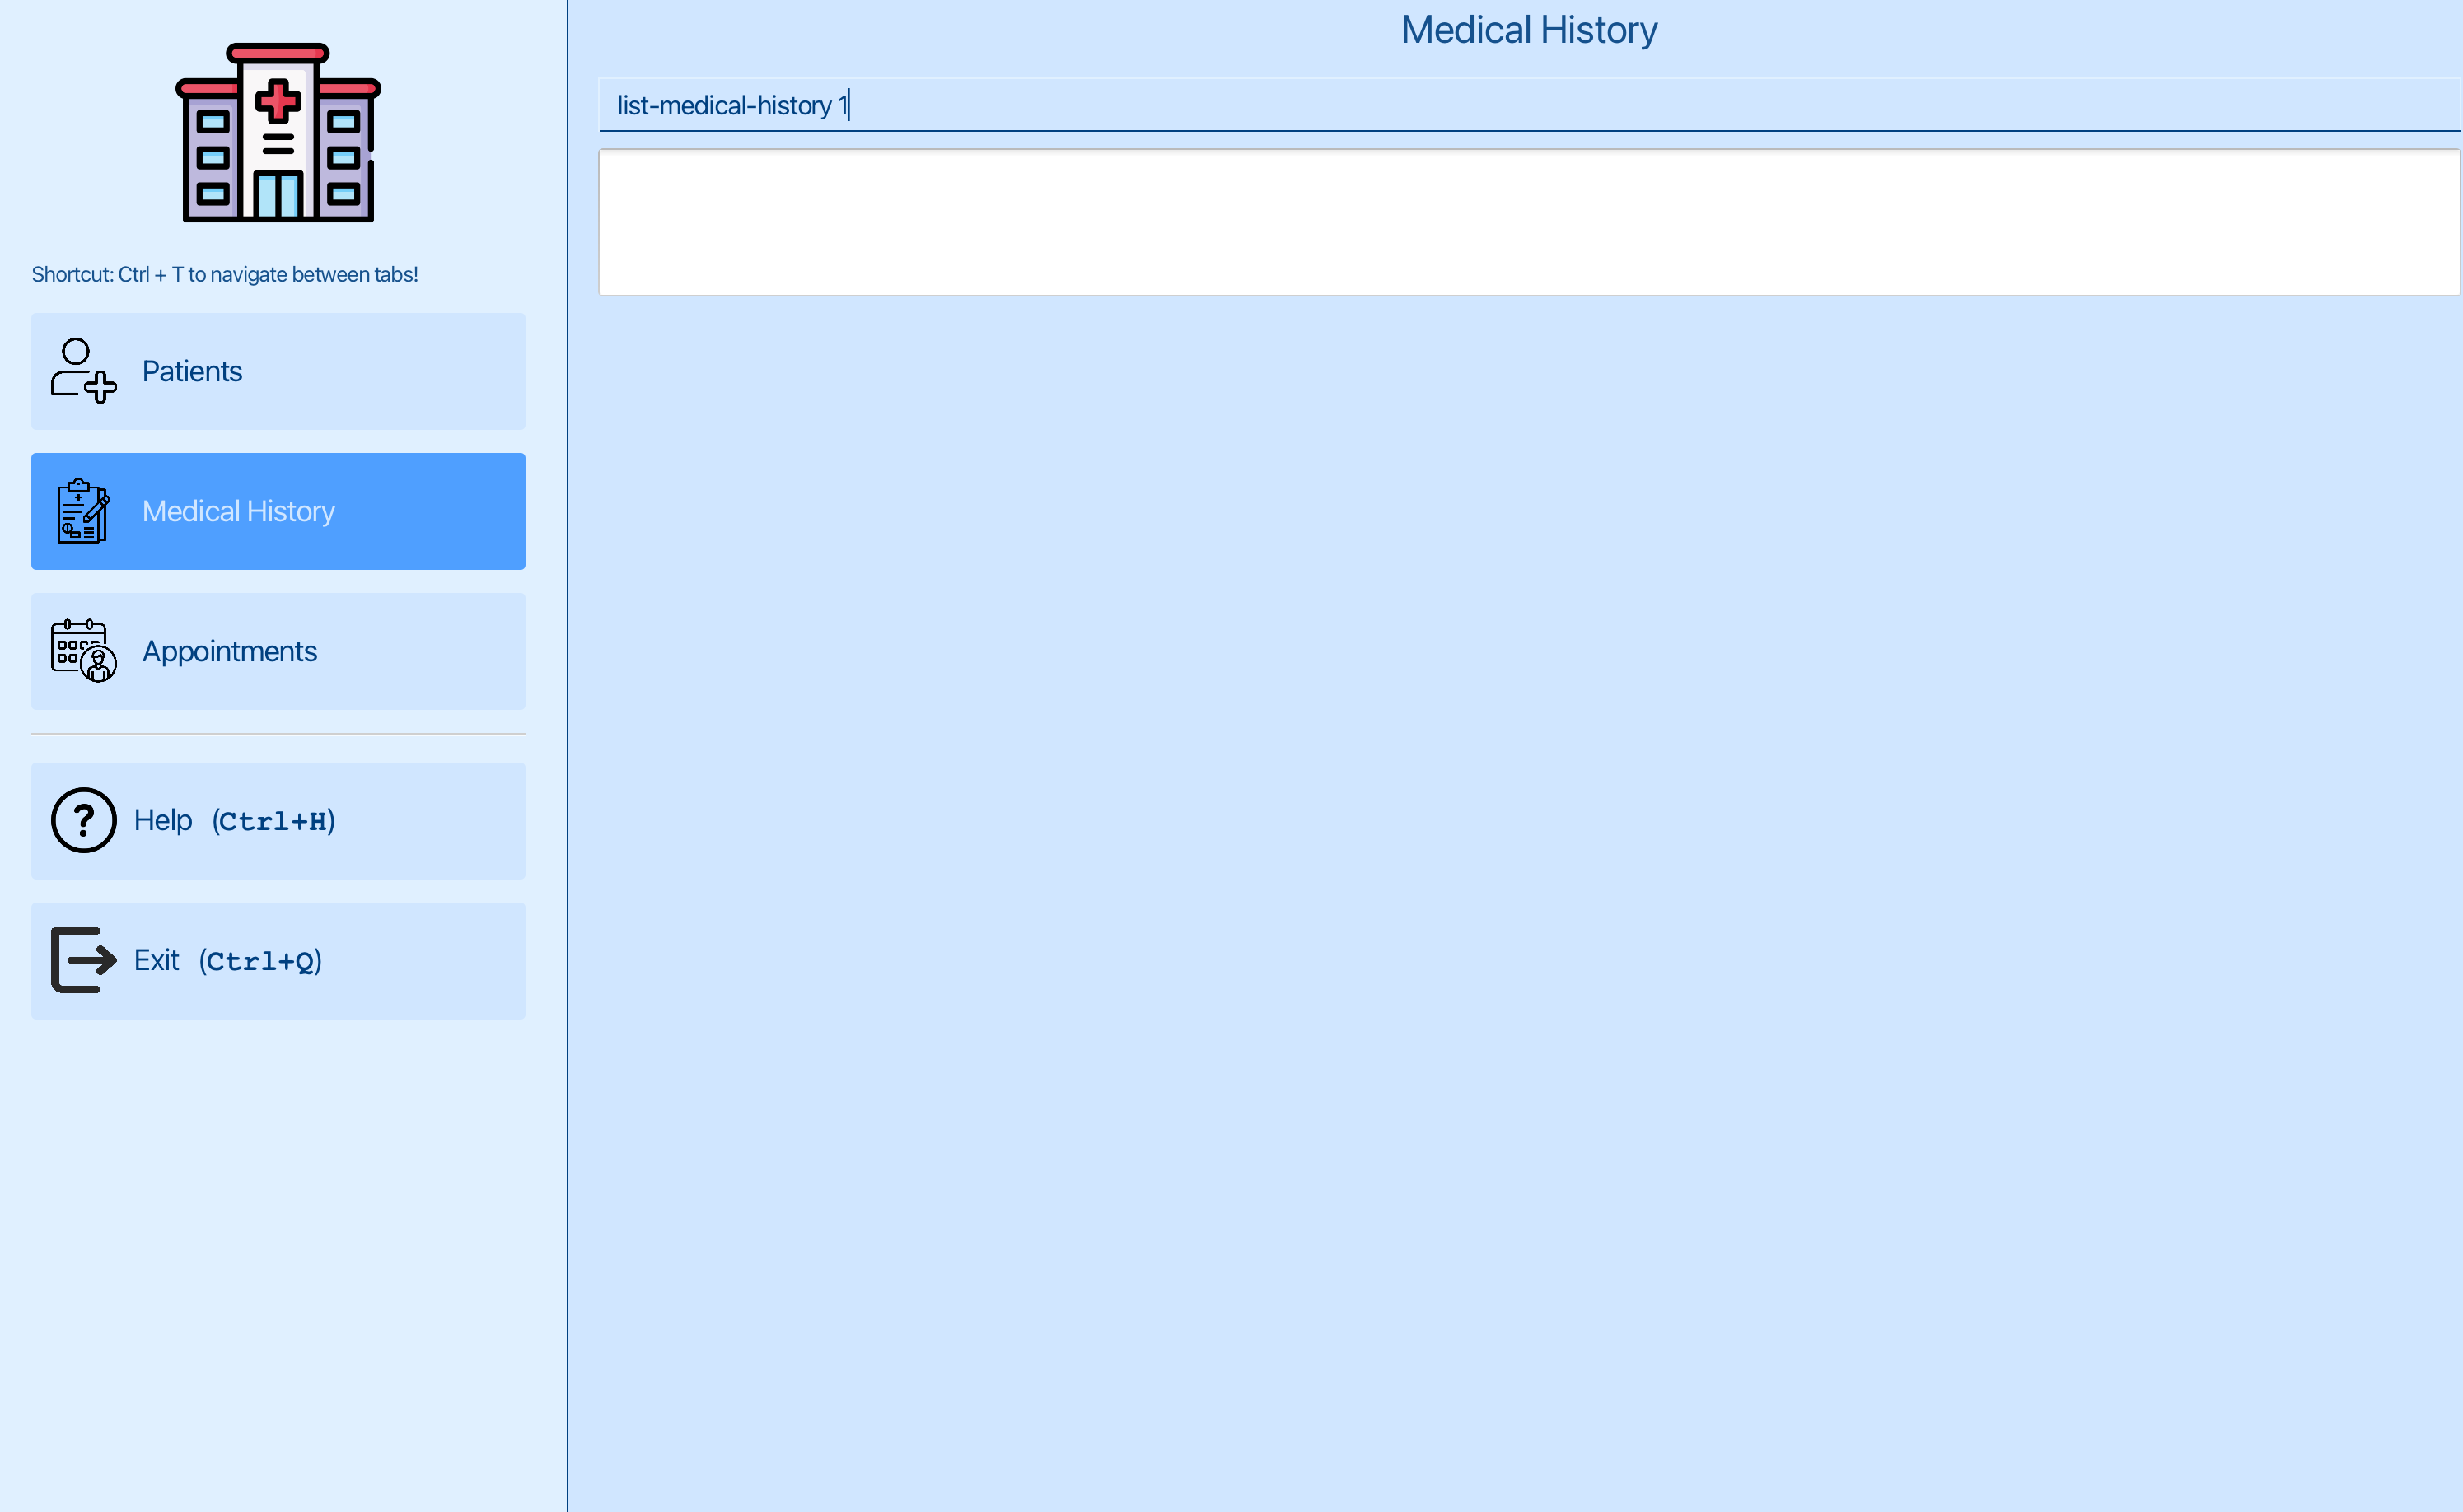
You can now list the medical history of the patient at index 1 using list-medical-history 1 , where 1 is the index of Alex Yeoh.
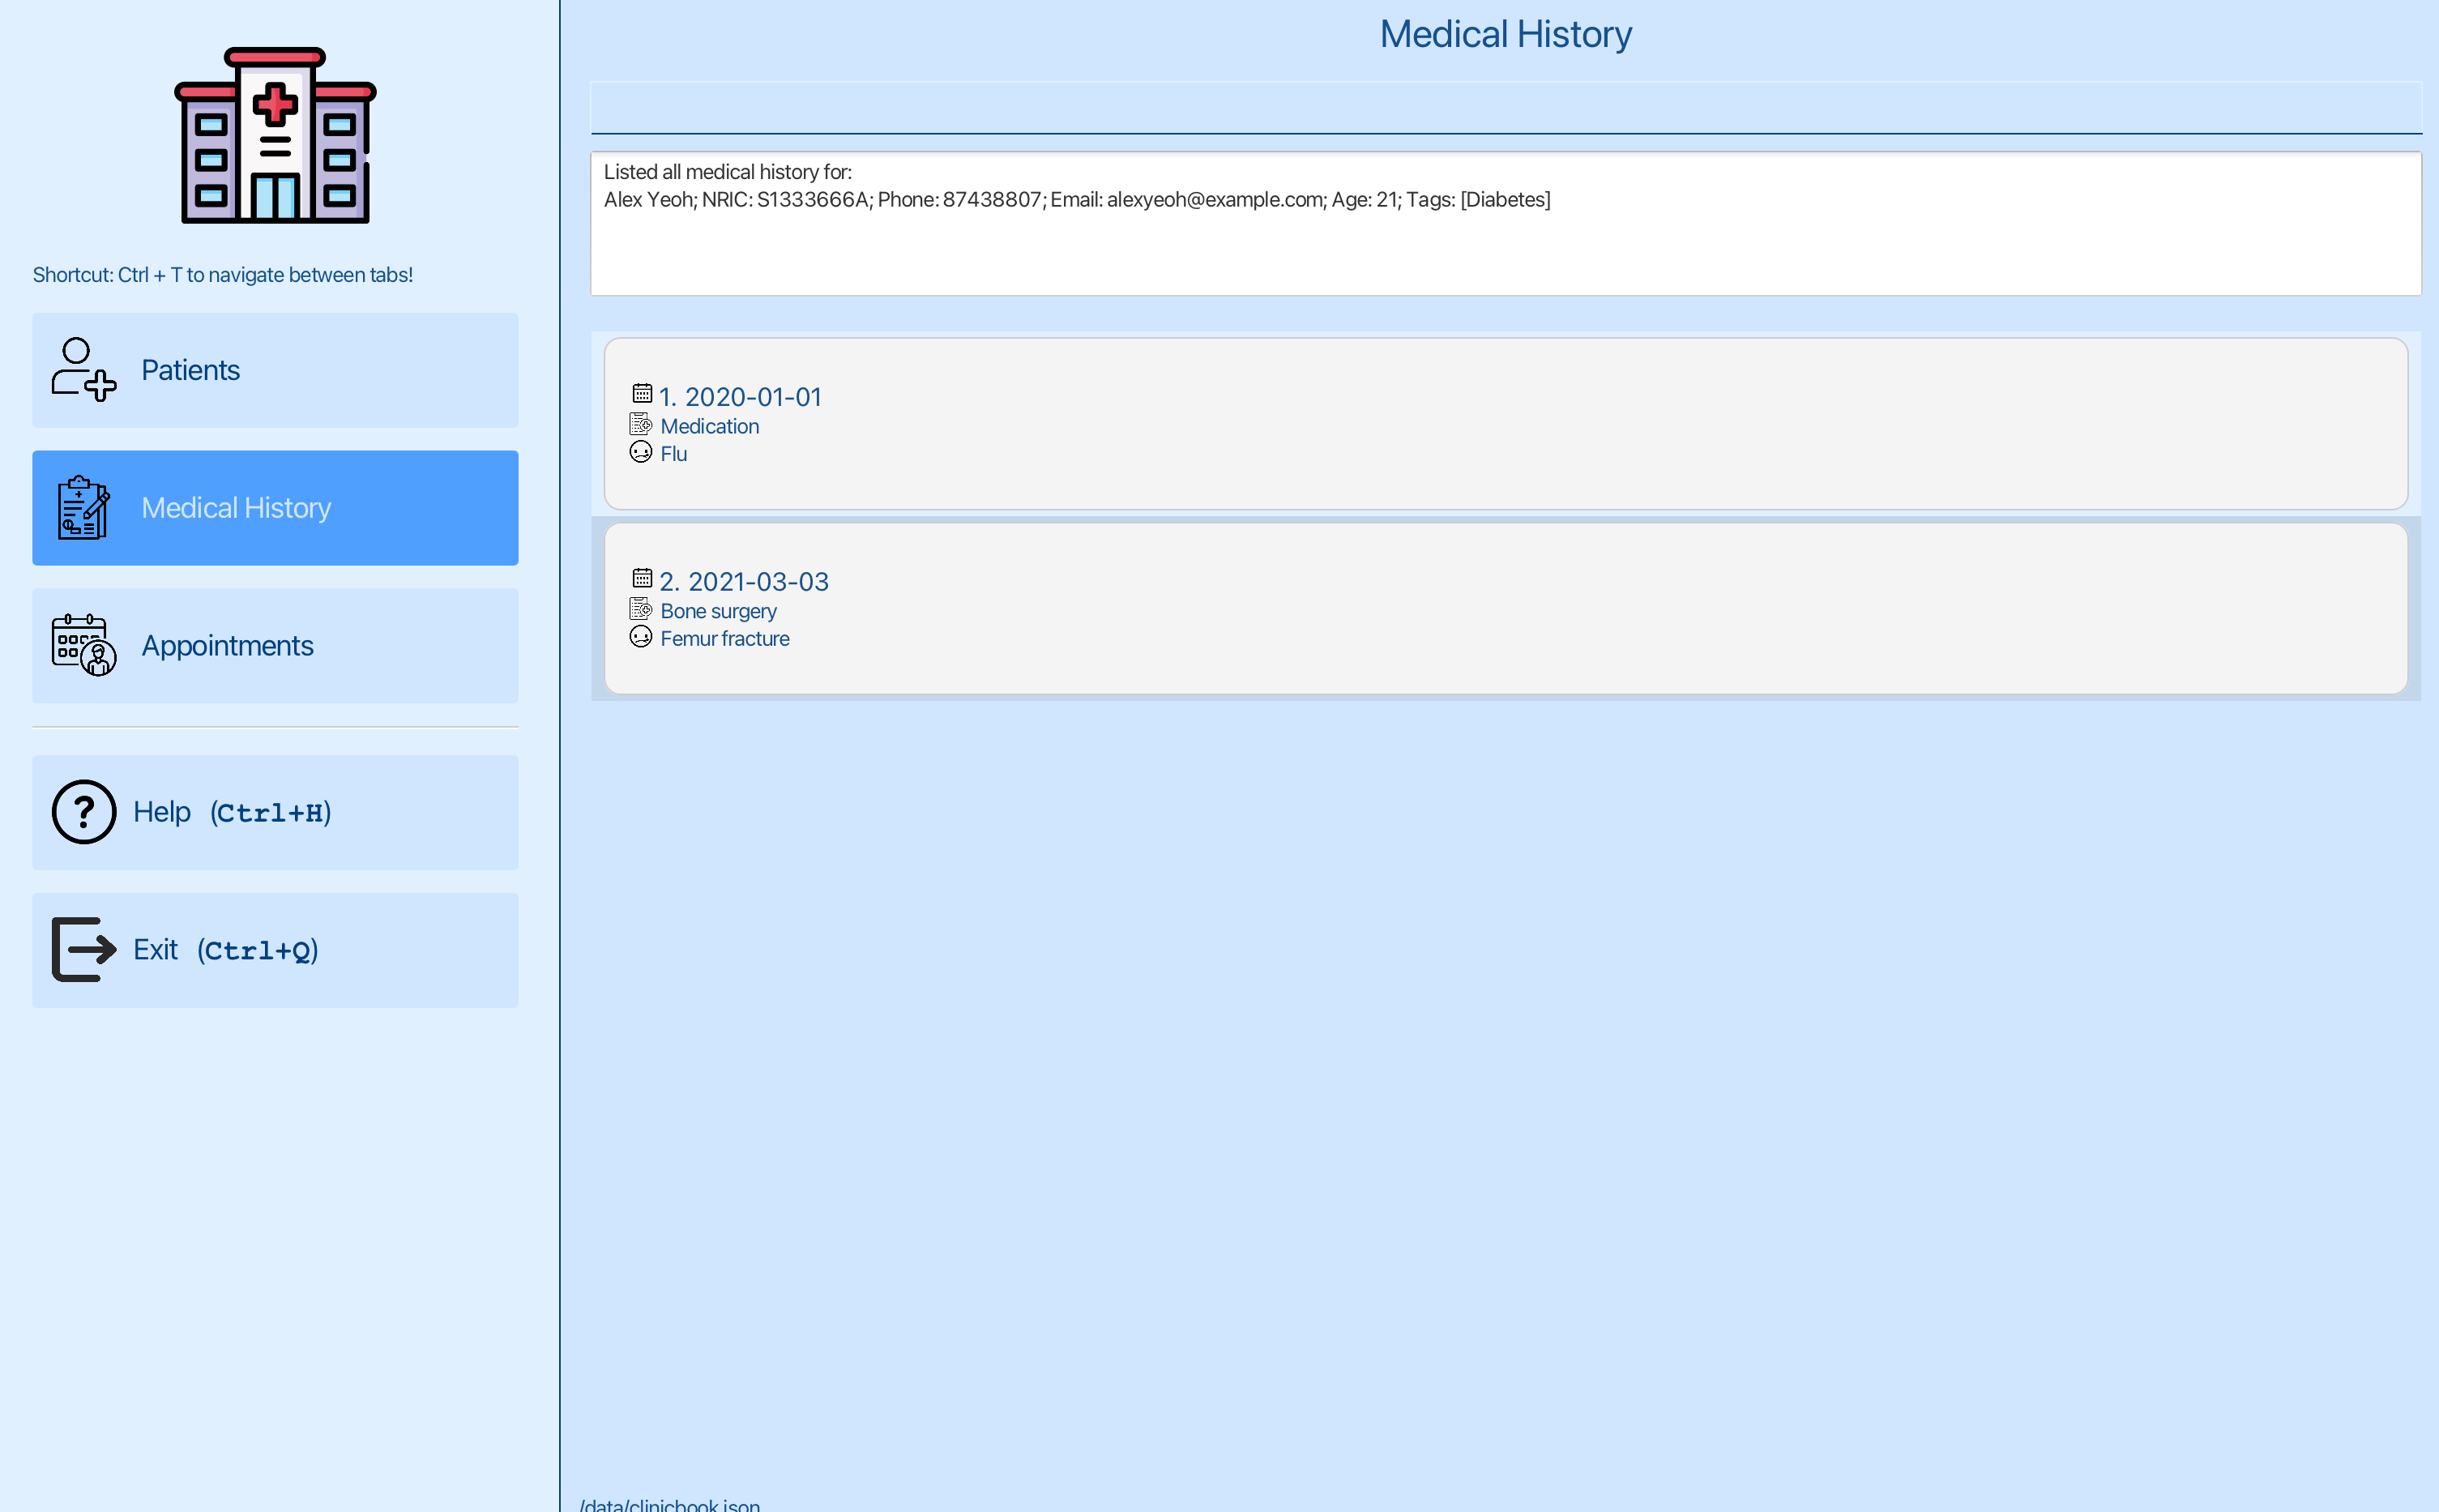
You can see the list of medical history for Alex Yeoh. You want to edit the second medical history entry for Alex Yeoh.
Step 2: Editing the medical history entry for Alex Yeoh:
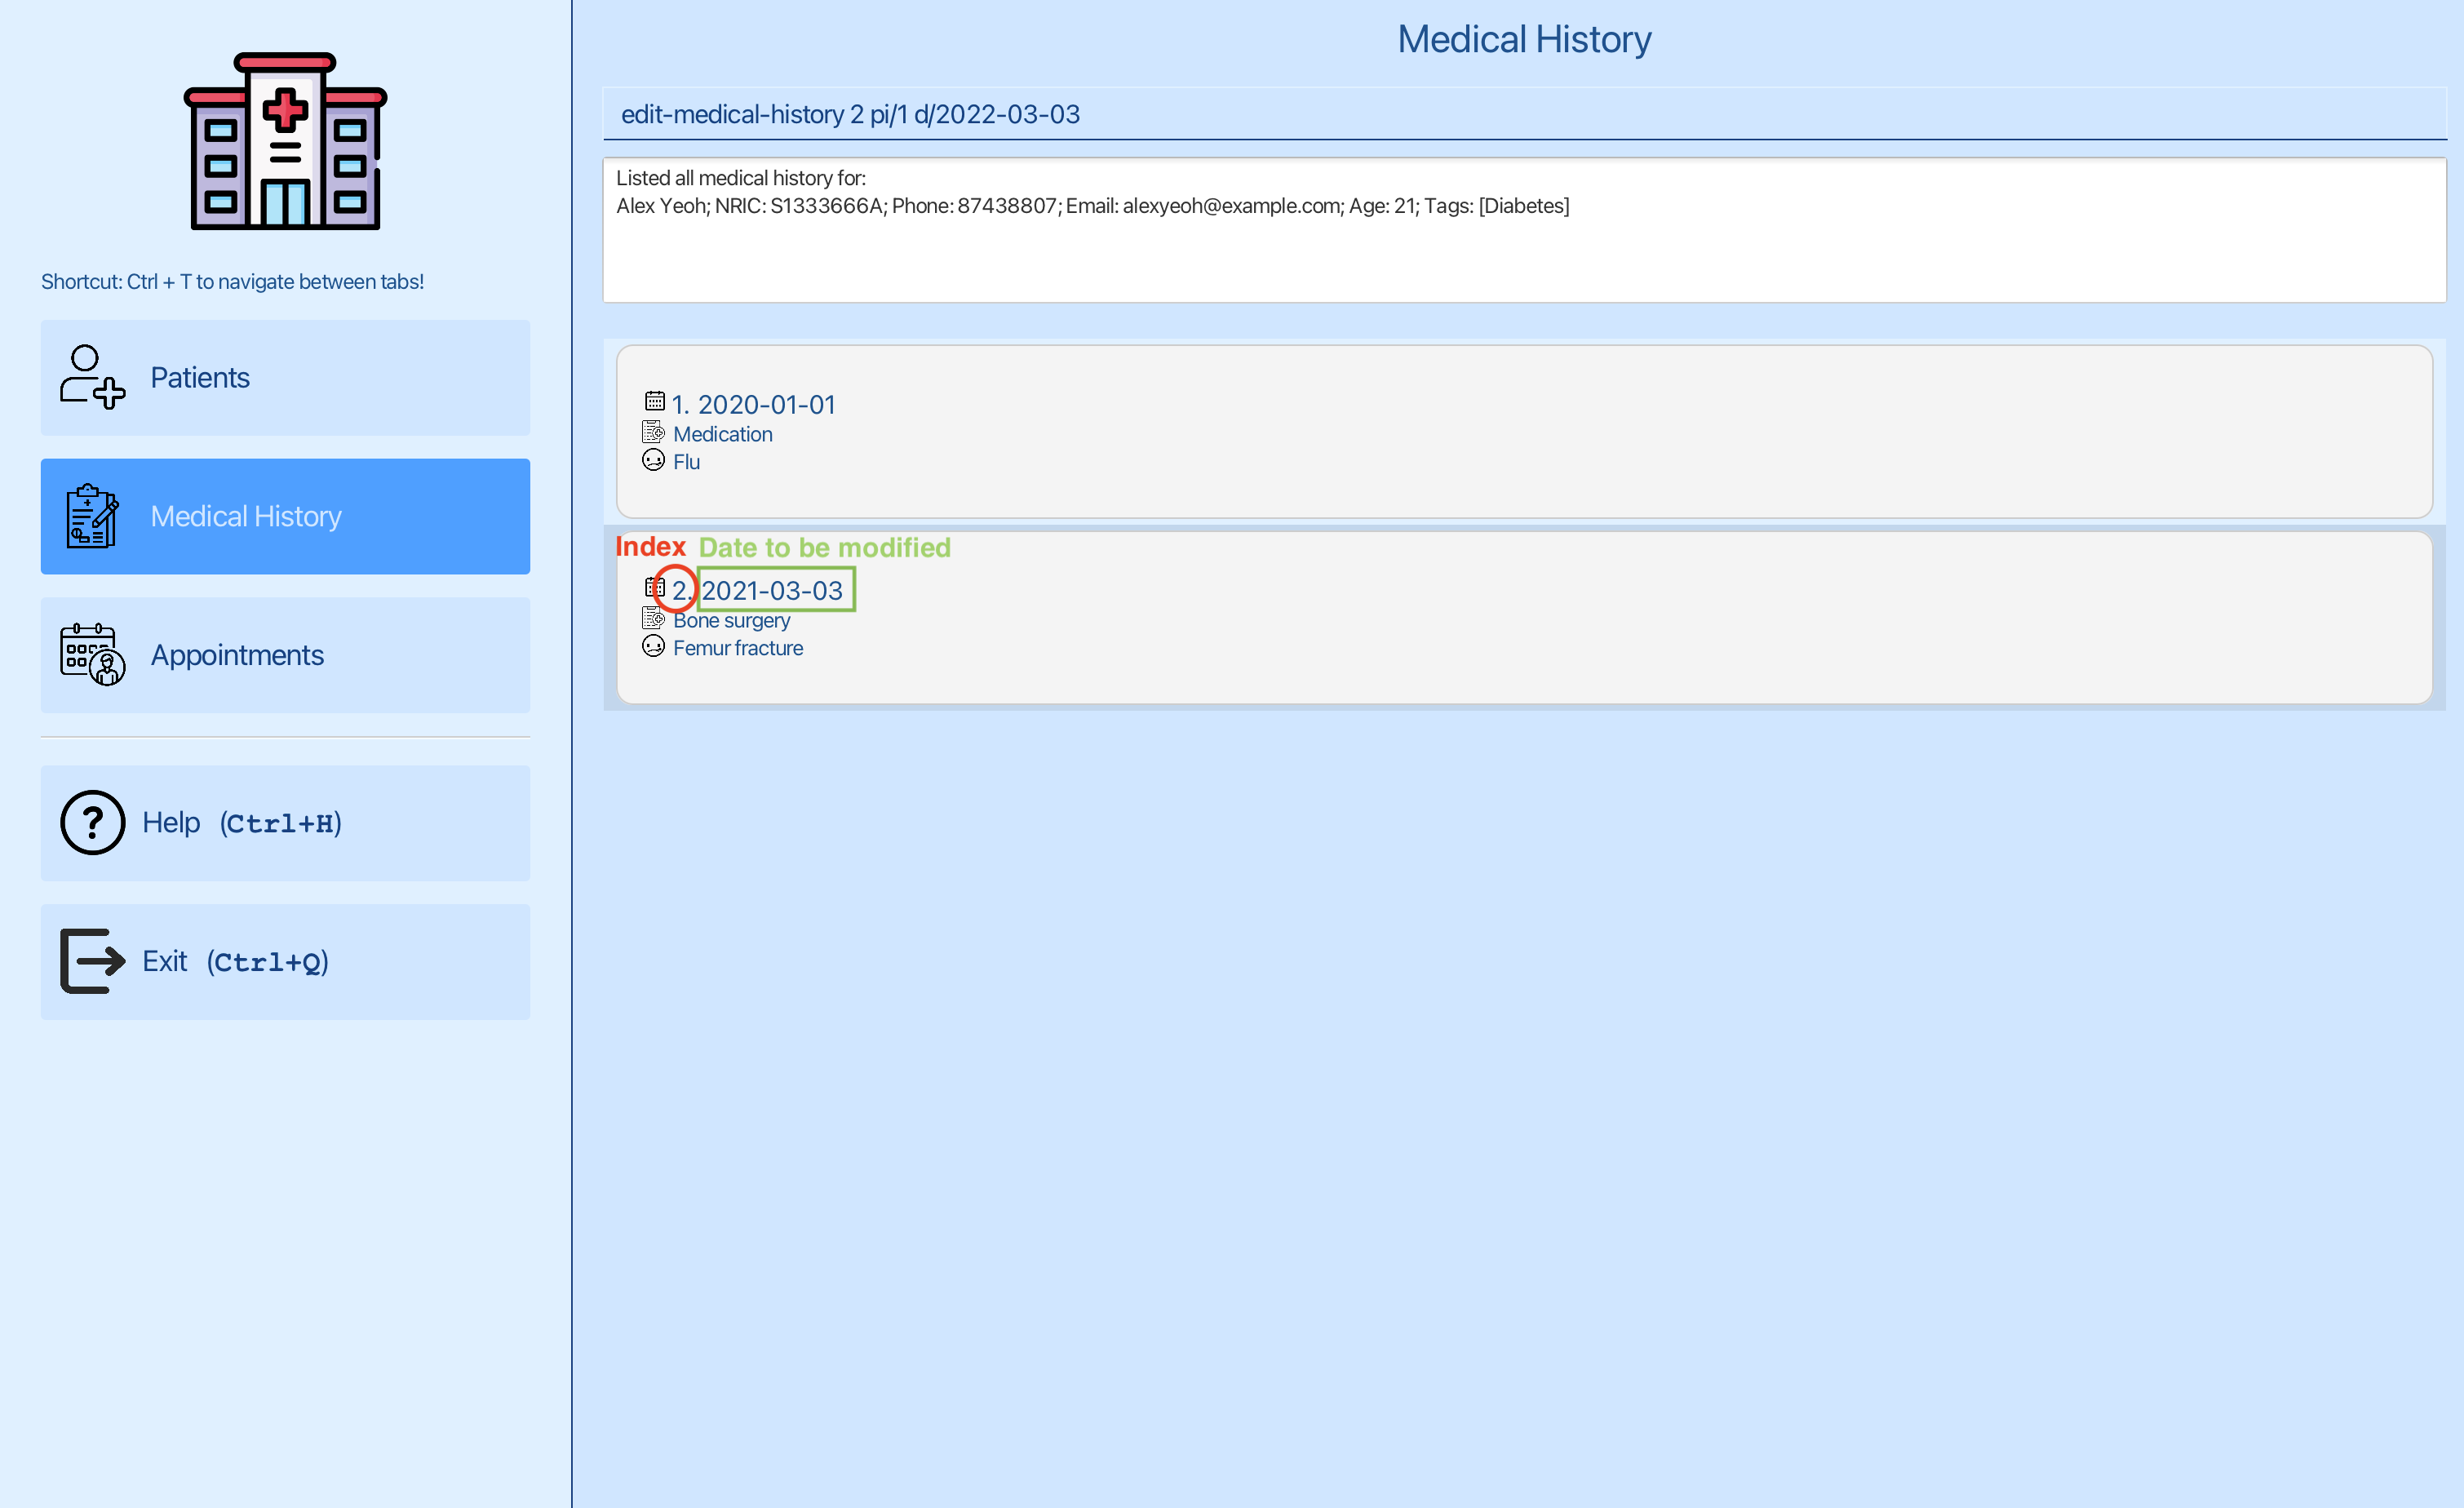
You can now edit the date of the second entry using edit-medical-history 2 pi/1 d/2022-03-03, where 2 is the index of the second entry and 1 is the index of Alex Yeoh.
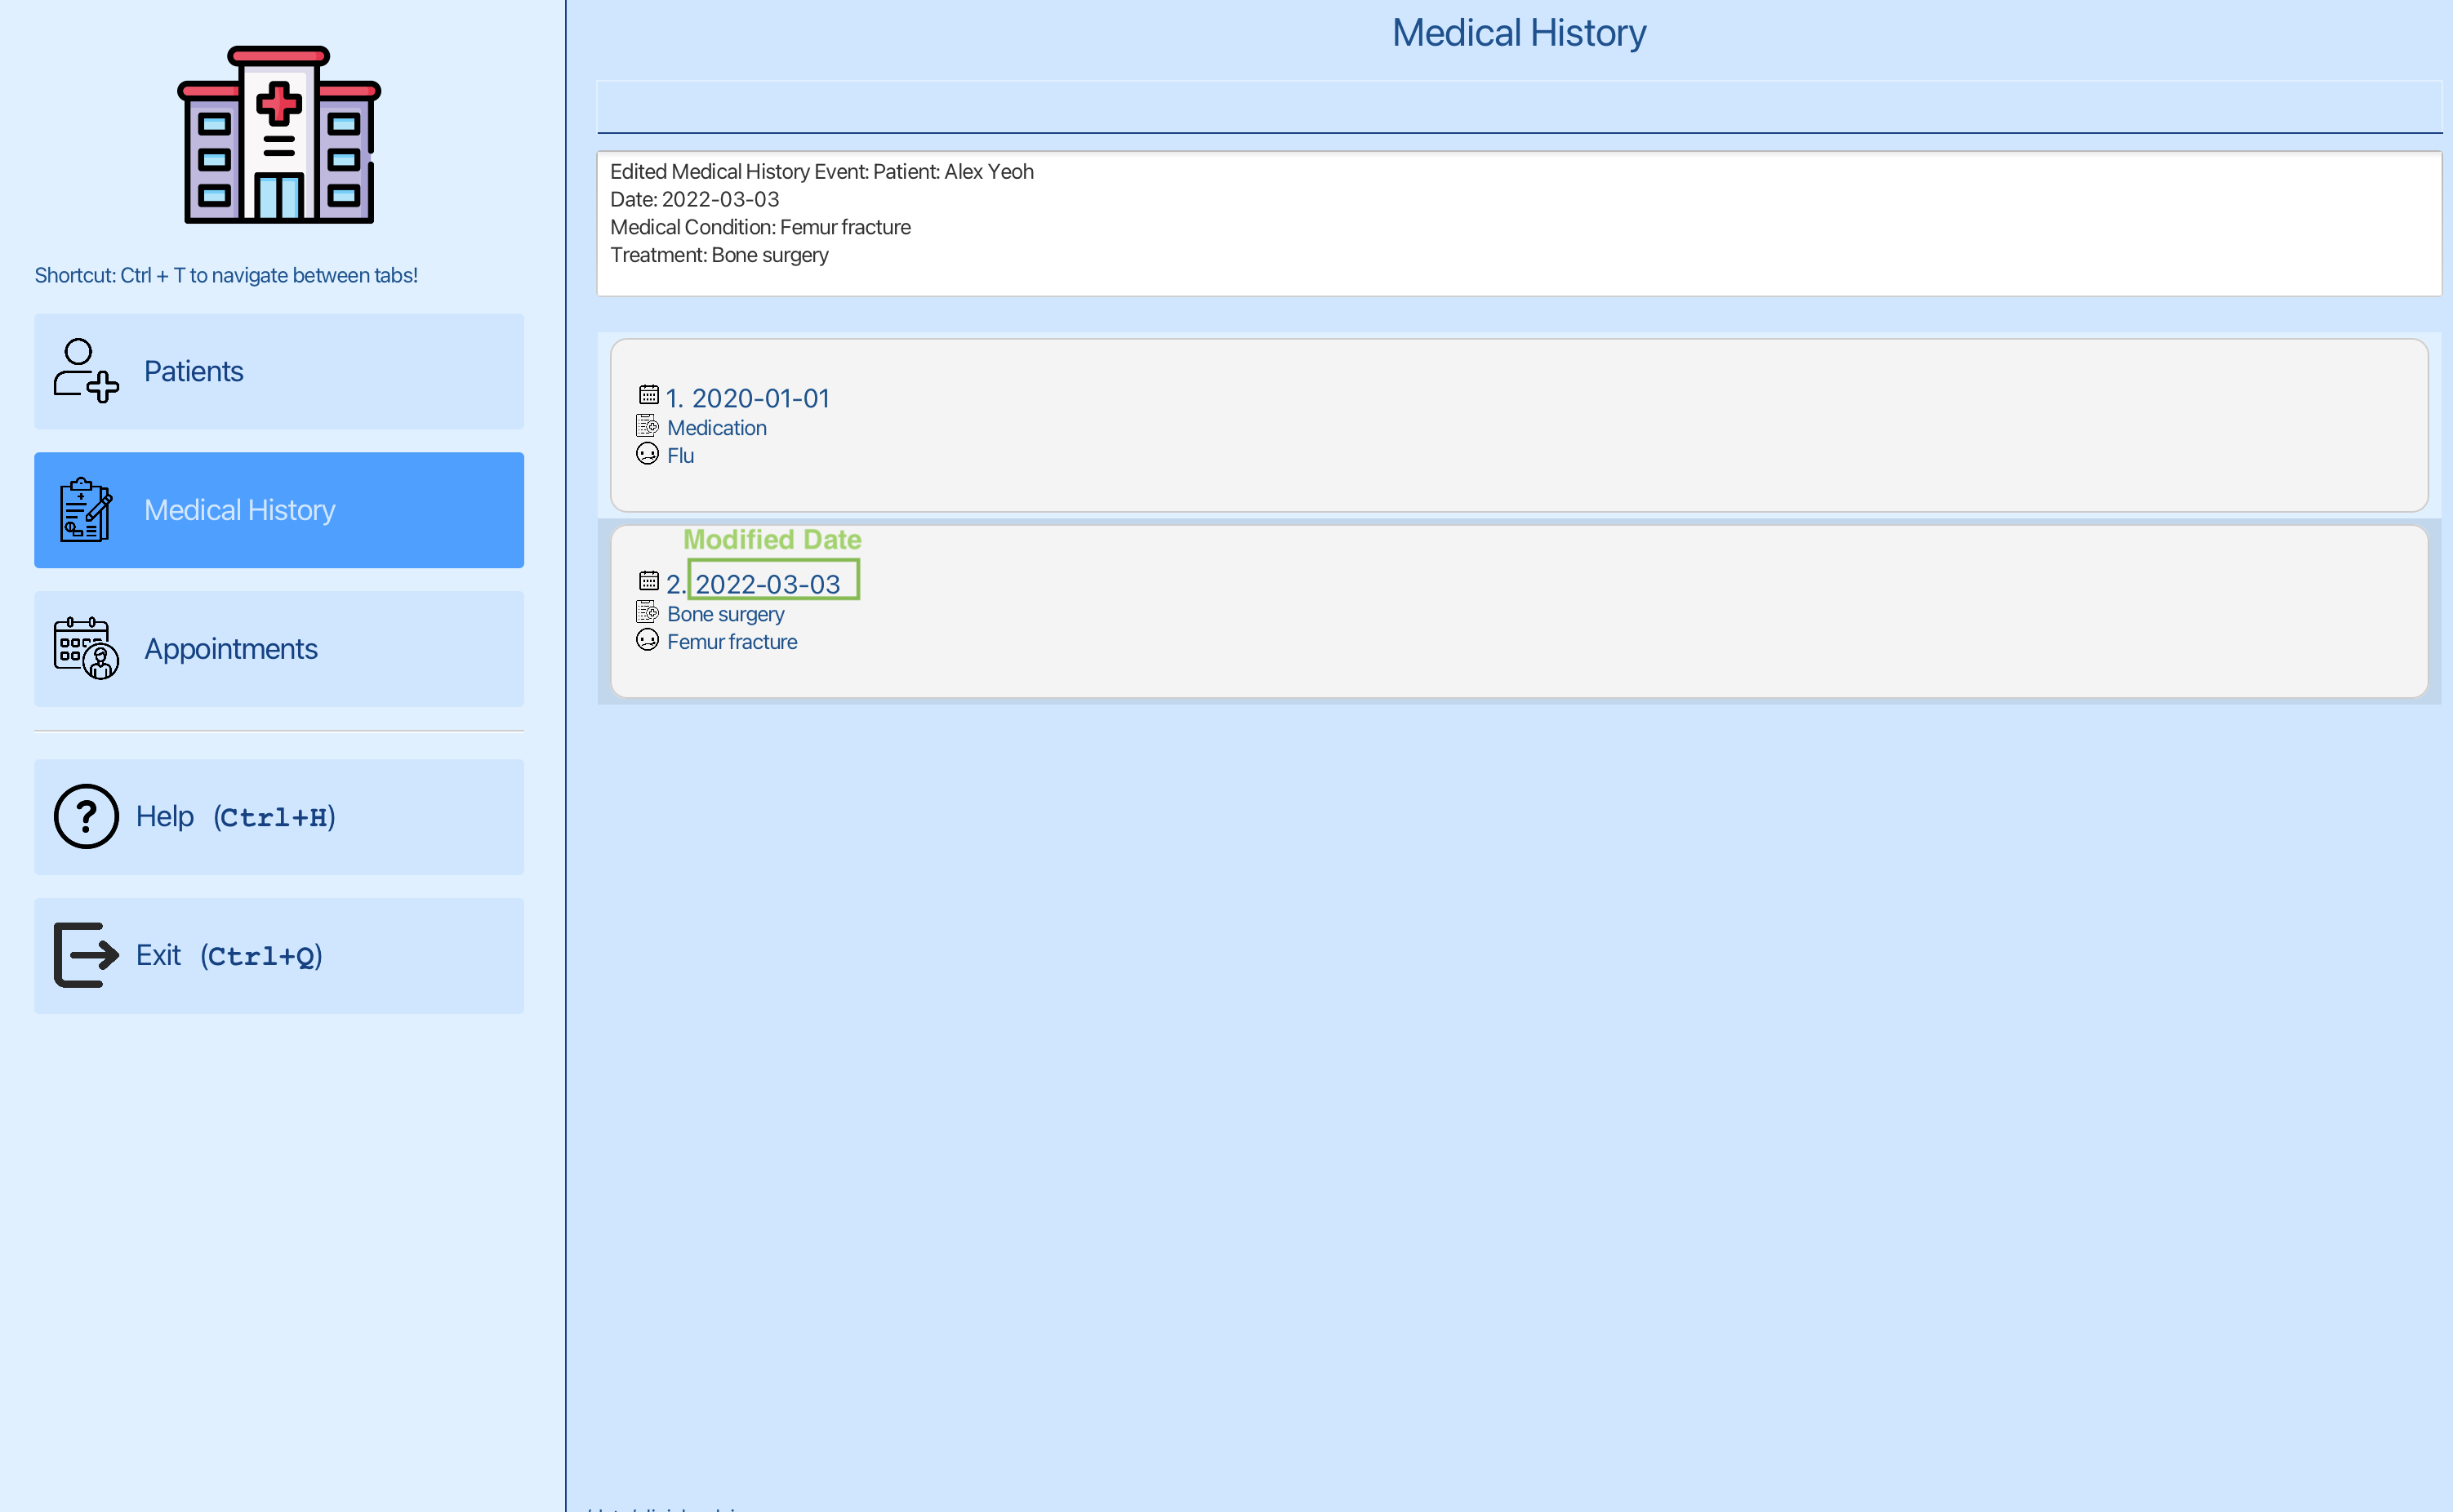
You can see that the date of the second entry has been changed to 2022-03-03.
The medical history of the patient that you plan to edit must be currently displayed:
- Use
list-medical-history PATIENT_INDEXto find the medical history entry you need to edit. - The command
edit-medical-history 2 pi/1 d/2023-10-01 mc/asthma t/Levabuterolwill modify the second medical history for the patient at index 1. - To edit records for a different patient, use their specific patient index to list their medical history first.
- Patient indices are available in the patients tab.
- Edited medical history details will replace the previous entries, so verify the information before editing.
Parameters
Let’s break down what each part of the command means:
| Parameters | Explanations | Constraints |
|---|---|---|
MEDICAL_HISTORY_INDEX |
Index of the medical history in the displayed medical history list | Must be a positive integer |
pi/PATIENT_INDEX |
Index of the patient in the displayed patient list. Can refer to patients tab to find out about the patient’s index | Must be a positive integer |
[d/DATE] |
The recorded date when the medical condition was diagnosed or noted | Must be in the format YYYY-MM-DD. Can only be dates earlier than today or today |
[mc/MEDICAL_CONDITION] |
Medical condition of the patient | Must only contain alphanumeric characters and spaces, and it should not be blank |
[t/TREATMENT] |
The treatment prescribed or administered for the medical condition. If no treatment, you can write ‘None’ | Must only contain alphanumeric characters and spaces, and it should not be blank |
5.3.4. Delete Medical History 🗑️📜
This command should only be used after
list-medical-history PATIENT_INDEX
What it does
This command allows you to delete a medical history of a patient. The medical history to be deleted is identified by the index number shown in the displayed list of medical history by list-medical-history.
Command Format
delete-medical-history MEDICAL_HISTORY_INDEX [pi/PATIENT_INDEX]
Example Commands
To delete the first medical history entry for the patient at index 1:
delete-medical-history 1 pi/1
Tutorial:
Step 1: Listing the medical history of the patient:

You want to delete a medical history entry for Alex Yeoh. You can see that the patient Alex Yeoh has an index of 1 in the patient list. Now you can switch to the medical history tab.

You can now list the medical history of the patient at index 1 using list-medical-history 1 , where 1 is the index of Alex Yeoh.

You can see the list of medical history for Alex Yeoh. You want to delete the first medical history entry for Alex Yeoh.
Step 2: Deleting the medical history entry for Alex Yeoh:
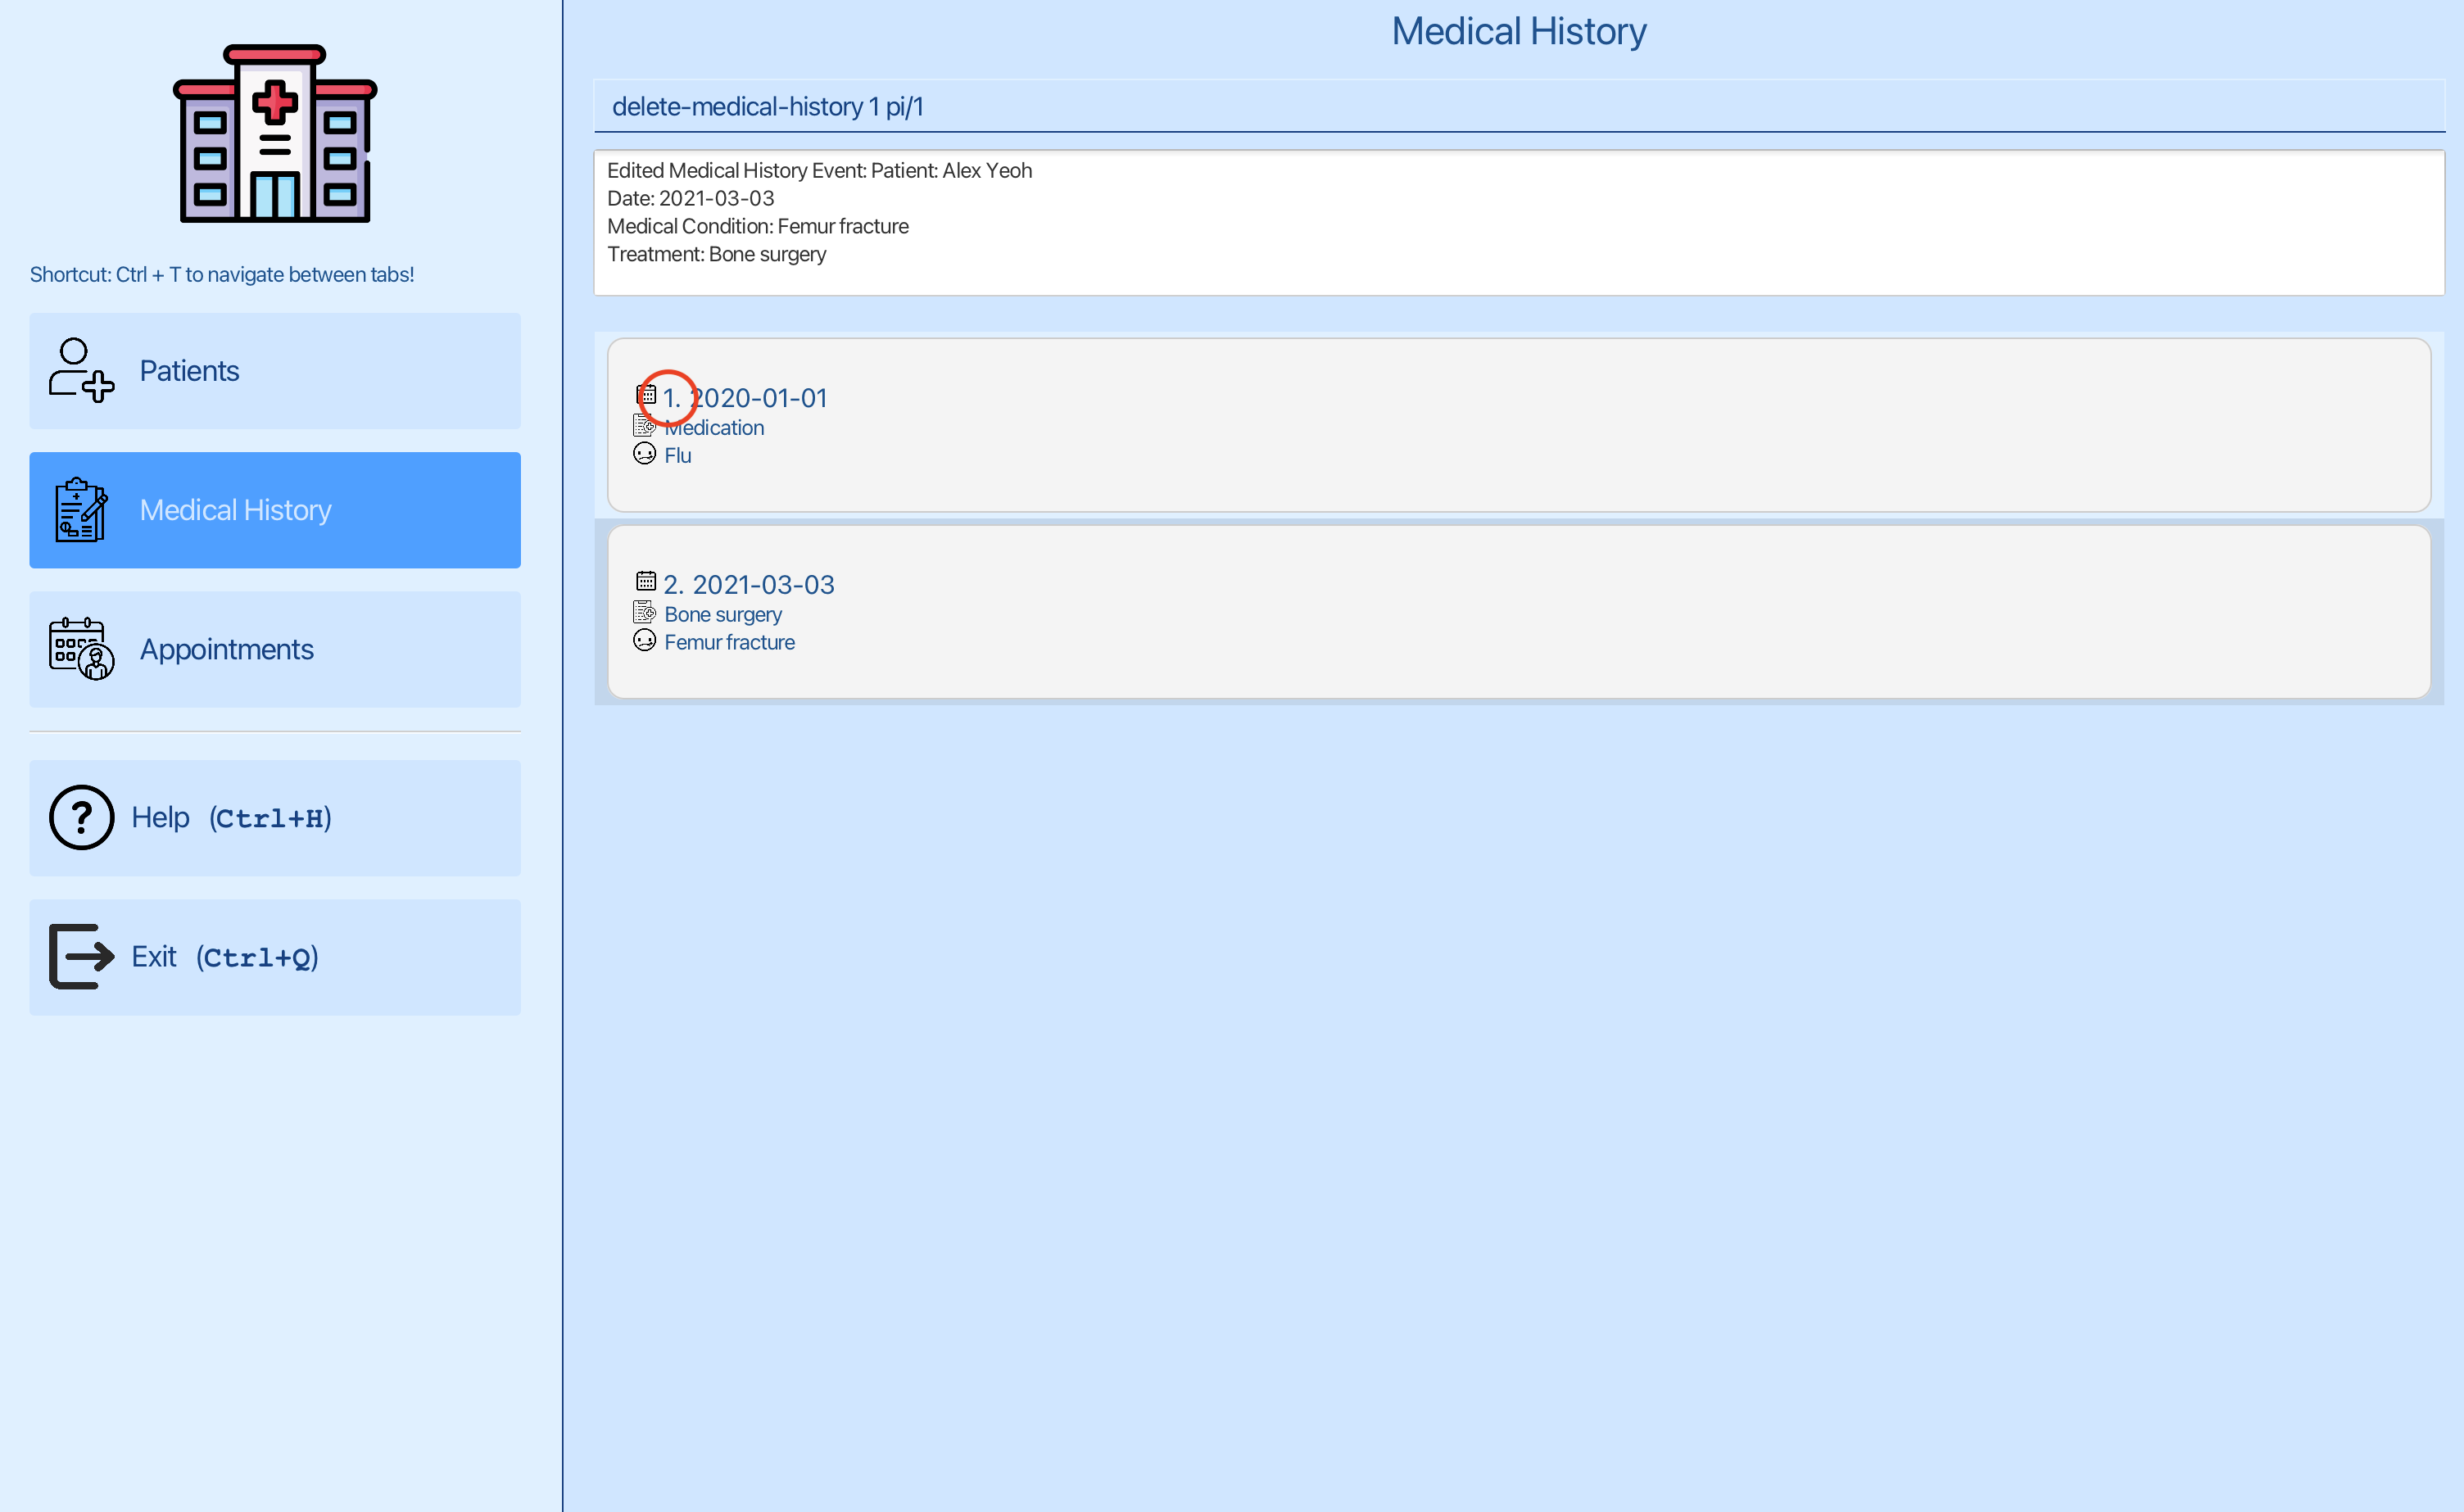
You can now delete the first entry using delete-medical-history 1 pi/1, where 1 is the index of the first entry and 1 is the index of Alex Yeoh.
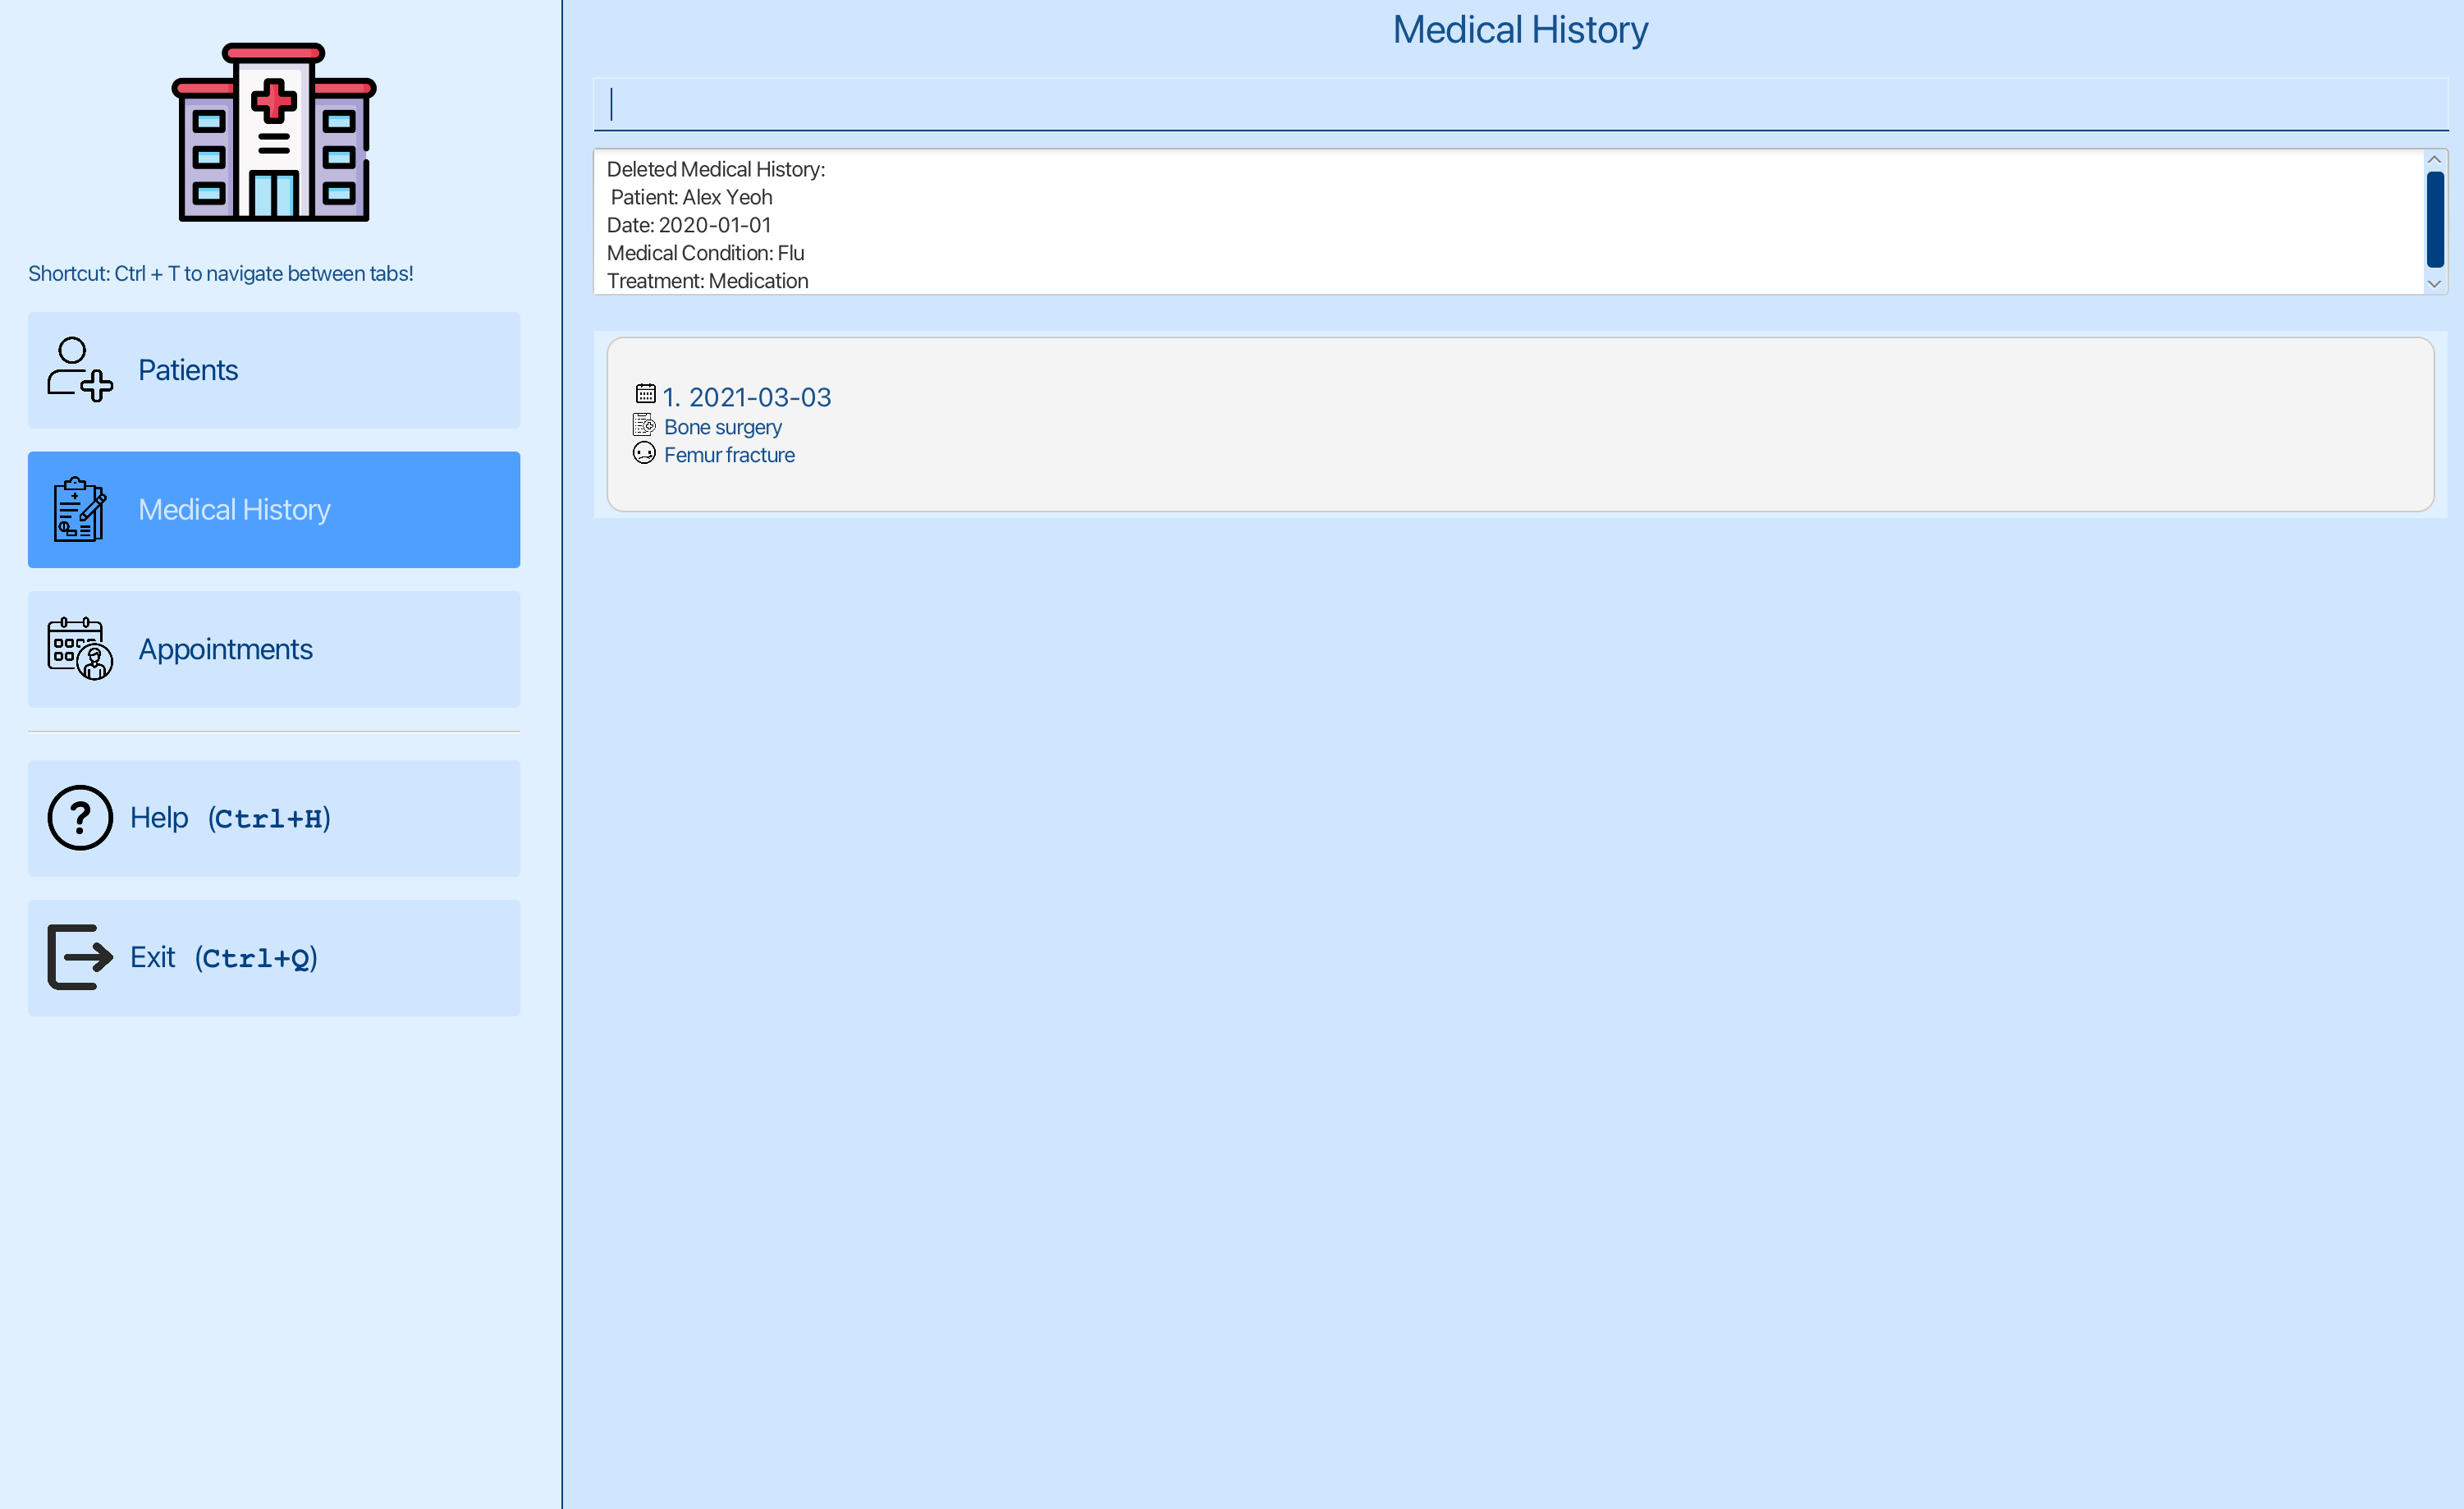
You can see that the first entry has been deleted.
Parameters
Let’s break down what each part of the command means:
| Parameters | Explanations | Constraints |
|---|---|---|
MEDICAL_HISTORY_INDEX |
Index of the medical history in the displayed medical history list | Must be a positive integer |
pi/PATIENT_INDEX |
Index of the patient in the displayed patient list. Can refer to patients tab to find out about the patient’s index | Must be a positive integer |
Final Reminder
Be cautious and verify the indexes accurately before deleting to avoid unintended data loss.
5.4. System Related Features ⚙️
5.4.1. Switch Tabs ⏩⚙️
What it does
This command allows you to switch between the different tabs in the sidebar.
Command Format
switch TAB_NUMBER
Example Command
To jump to the Medical History Tab:
switch 2
Parameters
Let’s break down what each part of the command means:
| Parameters | Explanations | Constraints |
|---|---|---|
TAB_NUMBER |
The target tab to switch to. 1: Patients Tab 2: Medical History Tab 3: Appointments Tab |
Must only be an integer |
5.3.2. Help❓⚙️
What it does
This command allows you to display the help page link and come back to this user guide whenever you need.
Command Format
help
Example Command
help
5.3.3. Clear Data 🗑️⚙️
❗Warning: The clear command will erase all data from the .json file and the action cannot be undone. Please use with caution.
What it does
This command allows you to clear all data from the system. This action will permanently erase all data, including all patient records, appointments, and medical history.
Command Format
clear
Example Command
clear
5.3.4. Exit 🚪⚙️
What it does
This command allows you to exit the program.
Command Format
exit
Example Command
exit
6. Command Summary 📚
| Action | Format | Examples |
|---|---|---|
| Add Patient | add-patient n/NAME ic/NRIC a/AGE p/PHONE_NUMBER e/email [t/TAG]… |
add-patient n/John Doe ic/S0123456A a/45 p/12341234 e/johndoe@example.com |
| List Patients | list-patients |
list-patients |
| Edit Patient | edit-patient PATIENT_INDEX [n/NAME] [ic/NRIC] [a/AGE] [p/PHONE_NUMBER] [e/EMAIL] [t/TAG]… |
edit-patient 5 n/John Doe ic/S0123456A a/45 p/12341234 |
| Delete Patient | delete-patient PATIENT_INDEX |
delete-patient 2 |
| Find Patient | find KEYWORD |
find John Doe |
| Add Appointment | add-appt PATIENT_INDEX d/DATE t/TIME |
add-appt 1 d/2023-10-01 t/14:00 |
| List Appointments | list-appointments PATIENT_INDEX |
list-appointments 1 |
| Edit Appointment | edit-appt APPOINTMENT_INDEX pi/patient-index [d/DATE] [t/TIME] |
edit-appt 2 pi/7 d/2023-10-05 t/16:00 |
| Delete Appointment | delete-appt APPOINTMENT_INDEX pi/patient-index |
delete-appt 3 pi/2 |
| Add Prescription | add-prescription APPOINTMENT_INDEX pi/PATIENT_INDEX mn/MEDICATION_NAME... |
add-prescription 1 pi/1 mn/Panadol |
| Edit Prescription | edit-prescription APPOINTMENT_INDEX pi/PATIENT_INDEX mn/MEDICATION_NAME... |
edit-prescription 1 pi/1 mn/Panadol mn/Paracetamol mn/Albuterol |
| Delete Prescription | delete-prescription APPOINTMENT_INDEX pi/PATIENT_INDEX |
delete-prescription 1 pi/1 |
| Add Medical History | add-medical-history PATIENT_INDEX d/DATE [mc/MEDICAL_CONDITION t/TREATMENT |
add-medical-history 1 d/2023-10-01 mc/asthma t/ventolin |
| List Medical History | list-medical-history PATIENT_INDEX |
list-medical-history 1 |
| Edit Medical History | edit-medical-history MEDICAL_HISTORY_INDEX pi/PATIENT_INDEX [d/DATE] [mc/MEDICAL_CONDITION] [t/TREATMENT] |
edit-medical-history 1 pi/1 mc/asthma t/ventolin |
| Delete Medical History | delete-medical-history MEDICAL_HISTORY_INDEX [pi/PATIENT_INDEX] |
delete-medical-history 1 pi/1 |
| Switch Tabs | switch TAB_NUMBER |
switch 1 |
| Help | help |
help |
| Clear Data | clear |
clear |
| Exit | exit |
exit |
7. Glossary 📚
The following terms are used throughout the CareCentral user guide:
| Word | Meaning |
|---|---|
CLI |
Command Line Interface - A text-based interface used for entering commands. In CareCentral, you’ll use the CLI to input your actions quickly. |
GUI |
Graphical User Interface - A visual interface with graphical elements. CareCentral’s GUI is designed for ease of navigation and information display. |
Integer |
A number that is not a fraction; A whole number. |
NRIC |
National Registration Identity Card number - A unique identifier for Singaporean residents. |
Parameters |
Information that is required for the command - Parameters are used to specify the details of the action you want to perform. For example, when adding a patient, you’ll need to specify the patient’s name, NRIC, age, phone number, email address, and any tags you want to add. |
Positive Integer |
A number that is not a fraction; A whole number that is greater than 0. |
Prescription |
Medicine prescribed by a medical professional - CareCentral allows you to manage and track prescriptions for each patient. |
String |
A sequence of alphabets joined together to form a word. |
Terminal |
A text-based interface to the computer - In a terminal, you can type commands, manipulate files, execute programs, and open documents. Here’s how you can open a terminal in Windows, macOS and Linux |